
If you've ever wanted to build an app for both iPhones and Android phones without having to learn two completely different programming languages, you're in the right place. This guide is your on-ramp. We’re going to build a real cross-platform app using a modern toolkit that sidesteps all the complex setup that usually trips people up.
This is the exact stack I’ve seen startups and even big companies use to get their apps to market, fast.
React Native’s magic is its "write once, run anywhere" promise. You code your app in JavaScript, and it runs natively on both iOS and Android. That’s a huge deal. Instead of juggling two separate codebases—one in Swift for iOS, another in Kotlin for Android—you manage just one. It’s a massive time and money saver, and it’s why everyone from Meta to Shopify has bet on it.
Looking at the wider mobile app development landscape, you'll see React Native isn't just a passing trend. It’s a solid, proven solution for building apps that feel genuinely native.
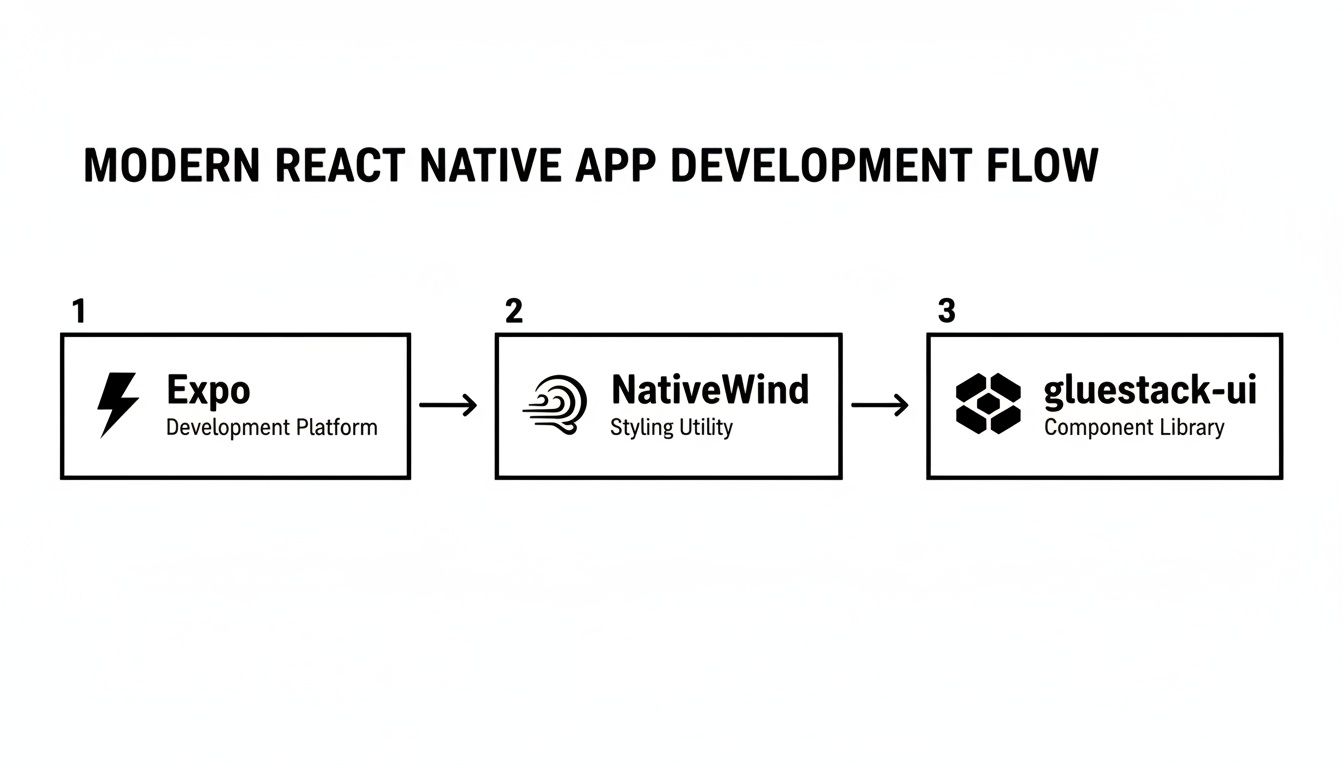
To keep things straightforward and powerful, we've handpicked a few essential tools. They work beautifully together and let you focus on building features, not fighting with configuration.
Here's a quick rundown of what we'll be using:
| Tool | What It Does | Why It's Great for Beginners |
|---|---|---|
| Expo | A platform and set of tools that massively simplifies React Native development. | It handles all the tricky native build stuff behind the scenes. You just write JavaScript. |
| TypeScript | A "superset" of JavaScript that adds type-checking. | It catches common bugs as you type, making your code stronger and easier to fix. |
| NativeWind | A utility-first styling library, essentially Tailwind CSS for React Native. | Lets you style your app incredibly fast without writing separate CSS files. |
| gluestack-ui | A library of pre-built, accessible, and themeable UI components. | Gives you production-ready buttons, forms, and modals right out of the box. |
These tools aren't just thrown together; they represent a complete, modern workflow. You start with the solid foundation of Expo and layer on TypeScript for robust code, NativeWind for rapid styling, and gluestack-ui for polished components. It’s a recipe for success.
This entire process is designed to get you from a blank screen to a running app in the shortest time possible.
This isn't some experimental setup. Heading into 2024–2025, React Native continues to be one of the most dominant cross-platform frameworks out there.
The tools we’re using, especially Expo, are wildly popular. With millions of monthly installs, it's clear this stack is trusted by a huge community, from solo developers building their first app to fast-moving startups shipping to thousands of users. It's a battle-tested approach.
Let's get your machine ready to build some real apps. If you've ever heard horror stories about wrestling with Xcode or Android Studio just to get a "Hello, World!" running, you can forget all that. We're going all-in on the Expo workflow, which sidesteps that entire mess with a few simple commands.
This modern approach means you won't get bogged down in native code or platform-specific headaches right out of the gate. Instead, we’ll install just what we need to write JavaScript and see it running live on your actual phone in a matter of minutes. Seriously, it's that quick. We'll walk through what each piece does so you're not just blindly pasting commands.

Before you can write a single line of code, you need two fundamental tools on your machine: Node.js and the Expo CLI. Think of Node.js as the engine that lets JavaScript run outside a web browser, and the Expo CLI as your command-center for creating and managing projects.
First up is installing Node.js. It comes bundled with something called npm (Node Package Manager), which is absolutely essential for grabbing other developer tools, including Expo. I always recommend grabbing the latest LTS (Long-Term Support) version directly from the official Node.js website for the best stability.
With Node.js in place, you can install the Expo CLI with a single command in your terminal:
npm install -g expo-cli
That -g flag is important—it installs the package globally, letting you run the expo command from any folder on your system. This one command is your new best friend for spinning up, starting, and managing your apps.
Pro Tip: If you're on macOS or Linux and get "permission denied" errors using
-g, don't default to usingsudo. It's a common hiccup. A much better long-term fix is to configure npm to use a different directory you have permissions for.
Here's where the magic really kicks in. Forget setting up clunky emulators on your computer that eat up memory. You’ll use your actual smartphone for live testing, which gives you a much better feel for how the app will look and perform in the real world.
Your next quick task is to download the Expo Go app on your phone:
This little app is a client that connects directly to your computer's development server. Any time you save a code change, it will instantly refresh on your phone. This rapid feedback loop is an absolute game-changer, especially when you're just starting out. For an even deeper dive on this part of the process, check out this guide on React Native setup that covers a few more tips.
Alright, with the tools ready, you’re set to bootstrap your first application. This is where you go from setup to actually making something.
Pop open your terminal, navigate to wherever you keep your coding projects, and run this command:
npx create-expo-app MyFirstApp --template
This command kicks off a script that downloads a starter project. When it asks you to pick a template, I highly recommend choosing the "Blank (TypeScript)" option. This gives you a clean slate but wires up the benefits of TypeScript from the very beginning, which will save you from a ton of silly bugs down the road.
Once that finishes, jump into your new project directory:
cd MyFirstApp
And now for the fun part. Start the development server:
npm start
Your terminal will show a big QR code. Just open the Expo Go app on your phone, scan that code, and watch as your first React Native app loads right onto your screen. You've officially gone from zero to a running cross-platform app. It's a great feeling.
Alright, with the setup out of the way, it's time for the fun part: actually building something you can see and touch. This is where the code stops being abstract and starts turning into a real interface on your screen. We're going to build a classic login form—it's the perfect real-world example to see just how powerful modern styling and component libraries are.
You’re about to find out how quickly you can put together something that looks slick and professional. Forget about writing endless lines of CSS from scratch. We’ll be using NativeWind to apply styles directly in our code and gluestack-ui to grab pre-built, production-ready components like buttons and inputs.

If you’ve spent any time in web development, you've almost certainly run into Tailwind CSS. It’s that utility-first framework that lets you build designs by embedding class names right into your markup. Well, NativeWind brings that exact same brilliant workflow over to React Native.
Instead of defining a clunky StyleSheet object and referencing styles from it, you just add familiar class names directly to your components. Need a dark background with centered content and a little bit of padding? You'd simply write something like className="bg-black justify-center items-center p-4". It's an incredibly fast way to work and keeps your styling logic right where it belongs—next to the component it affects.
Key Takeaway: NativeWind isn't just a convenience; it's a massive productivity booster. You stop context-switching between your component logic and a separate style file, which lets you build and tweak UIs at a much faster pace.
This utility-first approach also nudges you toward design consistency. By relying on a predefined set of classes for spacing, colors, and fonts, your app’s visual language stays cohesive without you having to memorize hex codes or pixel values. It’s a system that practically guides you toward a better design.
Let's start by gutting the default "hello world" content in your App.tsx file and laying down the foundation for our login screen. The two most fundamental building blocks in React Native are View and Text.
<div> of the mobile world. It’s your go-to container for grouping and organizing other components.Text component.We'll kick things off with a main View that will serve as our screen’s container. Using NativeWind, we can immediately make it fill the screen, give it a background color, and center everything inside it, both horizontally and vertically.
import { Text, View } from 'react-native';
export default function App() { return ( <View className="flex-1 bg-gray-100 justify-center items-center p-6"> <Text className="text-3xl font-bold mb-8 text-gray-800"> Welcome Back </Text> {/* Input fields and button will go here */} </View> ); }
In that little snippet, flex-1 tells the View to expand and take up all available space. The justify-center and items-center classes do the alignment magic, and p-6 gives us some nice breathing room around the edges. Just like that, we have a styled foundation ready to go.
Laying out boxes is one thing, but building robust, accessible, and good-looking form inputs and buttons from the ground up is a ton of work. This is where a component library like gluestack-ui becomes your best friend. It gives you a whole suite of pre-built, themeable components that follow best practices right out of the box.
Let’s pull it in to build out our form. Once you've installed gluestack-ui and its dependencies (just follow their official docs), you can start importing components. We'll need an Input for the email and password fields and a Button to submit the form.
Here’s how we can flesh out our previous code to include these elements:
// Imports from gluestack-ui import { GluestackUIProvider, Input, InputField, Button, ButtonText, Text, View } from '@gluestack-ui/themed'; import { config } from "@gluestack-ui/config"; // Your theme config
export default function App() { return ( <GluestackUIProvider config={config}> <View className="flex-1 bg-gray-100 justify-center items-center p-6"> <Text className="text-3xl font-bold mb-8 text-gray-800"> Welcome Back </Text>
    <Input variant="outline" size="lg" className="mb-4 w-full">
      <InputField placeholder="Email Address" />
    </Input>

    <Input variant="outline" size="lg" className="mb-6 w-full">
      <InputField type="password" placeholder="Password" />
    </Input>

    <Button size="lg" className="w-full">
      <ButtonText>Sign In</ButtonText>
    </Button>
  </View>
</GluestackUIProvider>
); }
A couple of things to notice here. First, we wrap our entire app in the GluestackUIProvider, which makes the theme available to all child components. Then, we just drop in the Input, InputField, Button, and ButtonText components. Because gluestack-ui was built with NativeWind in mind, we can still toss on utility classes like mb-4 (margin-bottom) and w-full (width 100%) to fine-tune the layout.
This hybrid approach gives you the best of both worlds: the solid structure of pre-built components and the fine-grained control of utility classes. It’s an incredibly powerful combination that just makes development so much faster. If you want to dive deeper into how well these two work together, you can learn more about using Tailwind CSS in React Native projects.
With just a handful of code, you've created a clean, functional login screen—a task that would have been way more tedious without these modern tools.
Building UIs from the ground up is a fantastic way to learn, but let's be honest—it's not always the fastest way to get a product out the door. Once you’ve got a handle on layout and styling, the next huge productivity boost comes from not reinventing the wheel for every single screen. This is where pre-built app templates become an absolute game-changer.
Why stare at a blank canvas when you can start with a professionally designed, fully functional foundation? App templates give you complete screens and user flows right out of the box. You get to skip the tedious boilerplate and jump straight into customizing the features that make your app special. It's all about building momentum.

For this project, we're going straight to a source built specifically for our modern tech stack: the gluestack market. This place is packed with free and premium templates that are already wired up with Expo, TypeScript, NativeWind, and gluestack-ui. That compatibility is huge. It means you can drop a template into your project and it just works—no messy integration headaches.
You'll find templates for all sorts of common app flows:
This is where the real acceleration kicks in. Instead of sinking weeks into building standard features, you can download a template and have a working prototype in a few hours.
Marketplaces like gluestack market are designed to turn learning momentum directly into product velocity. By providing production-ready templates, they let developers bypass 60–80% of routine UI work. That’s a massive leg up for anyone trying to launch an MVP quickly. You can see more about this accelerated workflow on YouTube.
This approach frees you up to focus your creative energy on your app's core idea, not on building yet another settings page.
Let’s walk through a real-world example. Imagine we're building a simple real estate app. Instead of coding a property listing screen from scratch, we can grab a free "card list" or "directory" template from the market to get a massive head start.
The process is refreshingly simple. Most templates on the gluestack market are just standalone GitHub repositories. All you have to do is clone the project, install the dependencies, and you're good to go.
git clone to pull the template's source code onto your local machine.cd into the new project folder and run npm install.npm start, scan the QR code with Expo Go, and boom—the template is running on your phone.Just like that, you have a multi-screen, professionally designed app running on your device. The foundation is laid. Now for the fun part: making it your own.
Having the template is one thing, but making it yours is where you really solidify what you've learned about components and styling. Let's take the home screen of our new real estate template and give it a quick makeover.
We'll change three things:
Pop open the home screen file (it's probably named something like HomeScreen.tsx). First, find the main <Text> component and change its content from "Featured Properties" to "Homes in Your Area." Easy. Next, track down where the image URLs are defined—this could be in a local data array or passed in as props. Swap out the placeholder URLs with some new images you've found.
Finally, the button color. Thanks to NativeWind, this is a breeze. Find the <Button> component and look for its className prop. You'll see a background color utility like bg-blue-500. Just change it to a color that fits your brand, maybe bg-green-600.
With just a few small edits, the screen already feels less like a generic template and more like your app. This iterative process—taking a solid foundation and tweaking it—is exponentially faster than starting from an empty file. It lets you focus on business logic and user experience, not the nitty-gritty of UI code. If you want to see more examples, check out these other mobile app templates to get ideas for your own projects.
Building the UI and plugging in a template gets you surprisingly far, but the last mile is what separates a project from a product. This is where you make sure your app is solid, reliable, and actually ready for real people. Before you can show off what you've built, it needs to be properly tested and packaged. This final phase is all about turning your local project into a real, installable application.
We'll walk through some practical, beginner-friendly ways to test using the tools you already have. Then, we’ll demystify the process of creating a "build"—the actual file you’ll eventually send to the app stores. It sounds intimidating, I know, but modern tools have made it much more straightforward than it used to be.
One of the most powerful features baked right into the Expo workflow is the ability to test your app on physical devices with almost zero effort. When you run npm start, that QR code you see in the terminal isn't just for one device. You can grab both an iPhone and an Android phone and scan it on both simultaneously.
This is a huge advantage. You get to see live updates on both platforms the moment you save your code, which lets you catch platform-specific UI bugs instantly. Does that button look perfect on iOS but get pushed out of place on Android? You'll spot it immediately, not weeks down the line during a formal QA session.
When things inevitably break, you need a way to peek under the hood and see what your app is really doing. While there are plenty of advanced debugging tools out there, the humble console.log is often the fastest way to figure out what's going wrong.
Let's imagine a sign-in button isn't updating some data like it should. You can sprinkle console.log statements throughout your code to trace the flow of information and see where the breakdown is happening.
const handleSignIn = () => {
console.log('Sign-in button pressed.');
// Imagine some logic here to validate user input
console.log('User data to be submitted:', { email, password });
// API call logic would go here
};
As soon as you press the button, these messages pop up right in the terminal window where you ran npm start. This simple trick confirms if a function is even being called, shows you the exact value of a variable at a specific moment, and helps you pinpoint where things are going sideways. It’s a fundamental skill you'll see in just about any react native tutorial for beginners.
My Personal Tip: Don't just log plain strings. Log objects like
console.log({ myVariable }). This trick prints both the variable's name and its value, making your logs way easier to scan when you have several of them going at once.
So far, your app has only ever run inside the Expo Go client on your phone. To get it ready for the Apple App Store or Google Play, you need to create a standalone build. Think of a build as a self-contained package (.ipa for iOS, .aab for Android) that bundles all your JavaScript code, images, and the native React Native framework into one neat file.
This used to be an incredibly complex and painful process, but Expo Application Services (EAS) now handles all the heavy lifting for you in the cloud. EAS Build takes your code, spins up a dedicated server for iOS or Android, and compiles your app into a submittable file without you needing a Mac for iOS builds.
First things first, you'll need to install the EAS command-line tool:
npm install -g eas-cli
Next, you'll just log in to your Expo account and let it configure your project:
eas login
eas build:configure
When you're ready to create a build, a single command is all it takes. For example, to kick off a build for Android, you'd just run:
eas build --platform android
EAS will ask a few quick questions, then upload your project and get to work. You can watch the progress right from your terminal or on the Expo website. Once it's finished, you get a downloadable link to your app file, ready for testing or store submission. This service transforms what was once a daunting, multi-day task into a simple command, making your app truly ready for the real world.
Alright, let's tackle some of the questions that always pop up when developers first jump into React Native. It's totally normal to have these floating around in your head, so let's clear them up right now.
This is probably the most common question I get. In 2024 and beyond, a motivated beginner can expect to put in 20–40 hours during their first month to get comfortable. That time is best spent working through tutorials, building small, hands-on projects, and maybe even using a guided template to see how the pros do it.
The most effective learning paths today are all-in on Expo and TypeScript, because that’s what the industry is actually using. If you want to see what a modern curriculum looks like, check out the React Native learning path on Codecademy to get a feel for the structure.
Nope! And honestly, this is one of the biggest wins for React Native. The entire point is to let you build for both iOS and Android with just one language: JavaScript (or, even better, TypeScript).
You write your code once, and the framework handles the heavy lifting of translating it into native UI elements behind the scenes. It’s why you can build so quickly without ever needing to open Xcode or Android Studio.
They're definitely family, but they have different jobs. Here’s how I explain it:
So, if you already know React, you're going to feel incredibly comfortable here. The core ideas—components, state, props—are identical. You'll just swap out a <div> for a <View> and a <p> for a <Text>.
The Big Takeaway: Your React skills are directly transferable. You already know the logic; you just need to learn the new building blocks. This shared DNA is what makes it so seamless for web developers to start building for mobile.
This is a fantastic question that gets to the heart of a smart development workflow. The two are meant for completely different stages of your project.
Your day-to-day will be spent coding with Expo Go running on your phone. You'll only fire up a build when you hit a major milestone and need to share it with the world.
Ready to skip the boilerplate and start with a production-ready foundation? gluestack market offers a huge library of free and premium React Native templates built with the modern stack you've just learned. Accelerate your next project by checking out our marketplace at https://market.gluestack.io.

Feb 23, 2026

4 min read
Discover powerful mobile app monetization strategies to boost your revenue. Our guide covers IAPs, ads, and subscriptions for React Native apps and beyond.

Feb 22, 2026
4 min read
A clear guide to app development cost estimation. Learn what drives costs, see budget examples, and discover strategies to build your app for less.

Feb 21, 2026
4 min read
Discover how to promote mobile application effectively with proven ASO, paid campaigns, and retention strategies.

Feb 15, 2026
4 min read
Discover how to create a prototype of a website with a practical, step-by-step guide. Explore tools, testing methods, and tips to bring your idea to life.

Feb 14, 2026
4 min read
Confused about mockups vs wireframes? Learn the key differences, when to use each, and how to streamline your React Native app development workflow.

Feb 13, 2026
4 min read
Discover how mobile apps templates accelerate development. Learn to choose, customize, and deploy high-quality React Native templates for your next project.

Feb 12, 2026
4 min read
Explore mobile application interface design with practical tips, core principles, and platform-aware workflows to craft apps users love.

Feb 10, 2026
4 min read
Learn mobile first design principles to craft fast, accessible apps that delight users. Practical tips, examples, and testing strategies.

Feb 08, 2026
4 min read
Explore the progressive web app vs native debate with our in-depth guide. We compare performance, cost, and UX to help you make the right strategic choice.

Feb 07, 2026
4 min read
Discover how React Native templates can accelerate your app development. This guide explores choosing, customizing, and deploying templates for faster launches.

Feb 05, 2026
4 min read
Discover the key differences between expo vs react native, including workflow, builds, and performance to help you pick the right path for your app.

Feb 03, 2026
4 min read
Master image with text overlay in React Native with responsive, accessible patterns. Learn expo setup, NativeWind styling, and gluestack-ui examples.

Feb 03, 2026
4 min read
Discover cross platform app development with proven strategies to build faster for iOS, Android, and the web using a single, unified codebase.

Feb 01, 2026
4 min read
Learn how to make an app for my business quickly with template-based steps from planning to launch, plus tips to scale and optimize.

Jan 31, 2026
4 min read
Ready to build an app? This guide shares practical strategies for validating your idea, choosing a tech stack, and navigating the App Store launch.

Jan 30, 2026
4 min read
Master responsive design for mobile apps with this guide on fluid layouts, breakpoints, and React Native. Build UIs that adapt perfectly to any screen.

Jan 25, 2026
4 min read
Learn how to design an Android app that stands out. This guide covers UX research, wireframing, Material Design, and the developer handoff process.

Jan 24, 2026
4 min read
Explore ui design web essentials: a complete guide to principles, responsive patterns, and workflows for intuitive, engaging web interfaces.

Jan 23, 2026
4 min read
Discover 10 essential mobile app design best practices for building exceptional cross-platform apps. Actionable tips for UI, UX, navigation, and performance.

Jan 21, 2026
4 min read
Discover how to debug React Native apps effectively. This guide covers Flipper, React DevTools, and native code troubleshooting for faster development cycles.

Jan 20, 2026
4 min read
Learn how to create app for your business with a practical, modern approach. Plan, customize, and launch with proven steps.

Jan 19, 2026
4 min read
A complete guide to mobile app development for startups. Learn how to validate your idea, build an MVP, and launch a successful app faster and more affordably.

Jan 18, 2026
4 min read
Discover how to choose the right React website template to accelerate your project. Our guide covers everything from quality checklists to deployment.

Jan 17, 2026
4 min read
Discover how to choose, customize, and deploy a React Native app template. This guide provides practical steps for launching production-ready apps faster.

Jan 16, 2026
4 min read
Discover how mobile application templates accelerate development. This guide covers how to choose, customize, and launch your app with the right foundation.

Jan 13, 2026
4 min read
Start your journey in mobile app development for beginners. This guide breaks down how to build your first cross-platform app with React Native and Expo.

Jan 12, 2026
4 min read
Explore the best react native ui libraries and compare features, performance, and ease of use to pick the right toolkit for your app.

Jan 11, 2026
4 min read
Launch your own ride-hailing service with our guide to building a production-ready Uber app clone. Learn MVP strategy, tech stacks, and backend integration.

Jan 10, 2026
4 min read
Master modern cash app design with this guide. Learn the UI/UX, security, and React Native strategies needed to build a fintech app that users trust and love.

Jan 09, 2026
4 min read
Learn how to build a personal finance dashboard with React Native. A practical guide for developers on UI design, data architecture, and production readiness.

Jan 08, 2026
4 min read
A practical guide to building a cross-platform event check in app with React Native. Learn to implement QR scanning, offline sync, and deployment.

Jan 07, 2026
4 min read
Master linear gradient React Native components with our complete guide. Learn practical techniques for Expo, bare RN, and NativeWind to build stunning UIs.

Jan 06, 2026
4 min read
Learn how to change application name in your React Native & Expo projects. This guide covers display names, package IDs, and app store listings.

Jan 05, 2026
4 min read
Discover how to monetize mobile apps with our founder's guide. Learn proven React Native strategies for ads, IAPs, and subscriptions to maximize your revenue.

Jan 04, 2026
4 min read
A practical guide on how to create a website app with a single codebase. Learn to build for web, iOS, and Android using React Native, Expo, and TypeScript.

Jan 03, 2026
4 min read
Learn how to create an app for your business with this definitive guide. Discover practical strategies for validation, development, and launch that work.

Jan 02, 2026
4 min read
Learn how to create a wireframe for a website with this practical guide. Move from initial sketches to developer-ready designs that get built right.

Jan 01, 2026
4 min read
Deciding on progressive web application vs native? This guide offers a deep comparison of performance, cost, UX, and use cases to help you choose wisely.

Dec 31, 2025
4 min read
Discover 10 mobile app security best practices for React Native. Learn to secure data, APIs, and code with actionable tips and examples for 2025.

Dec 30, 2025
4 min read
Unlock the real React Native app development cost. Our guide breaks down pricing by feature, team, and complexity to help you budget with confidence.

Dec 29, 2025
4 min read
A practical guide to master your React Native debug workflow. Learn to use Flipper, React DevTools, and Hermes to solve bugs in Expo and bare RN apps.

Dec 27, 2025
4 min read
A practical guide on how to build a mobile app. Learn to go from concept to a market-ready app using templates, React Native, and proven development strategies.

Dec 26, 2025
4 min read
Discover interface design for websites with actionable tips on layout, responsiveness, and usability to boost conversions.

Dec 25, 2025
4 min read
Discover designs for apps that blend minimal aesthetics with personalization, and learn to build user-centric interfaces that boost engagement.

Dec 24, 2025
4 min read
Learn graphical interface design - essentials for mastering core principles, modern workflows, and cross-platform strategies to build intuitive, engaging UIs.

Dec 23, 2025
4 min read
Discover how high fi wireframes bridge the gap between ideas and code. Learn a practical workflow for creating, testing, and handing off effective UI designs.

Dec 22, 2025
4 min read
Discover mobile app interface design with practical principles, accessibility, and workflows that boost user engagement.

Dec 21, 2025
4 min read
Explore the top 10 UI UX design trends for 2025. Get expert insights and practical React Native tips to build next-gen cross-platform apps that stand out.

Dec 20, 2025
4 min read
Discover how mobile app templates accelerate development from idea to launch. Learn to select, customize, and deploy templates for a faster time to market.

Dec 18, 2025
4 min read
Explore the best react native ui libraries to accelerate mobile development with performance, theming, and accessibility. Expert tips inside.

Dec 16, 2025
4 min read
Master React Native PDF handling. Learn to generate, view, and share PDFs with practical code examples, library comparisons, and performance tips.

Dec 15, 2025
4 min read
A practical guide to choosing the right React Native component library. Learn how to evaluate options, avoid common pitfalls, and build apps faster.

Dec 14, 2025
4 min read
Find the perfect React Native UI library for your project. This guide compares top libraries, selection criteria, and customization strategies.

Dec 13, 2025
4 min read
Learn how to change app name in React Native and Expo. Our guide covers display names, bundle IDs, and store listings for iOS and Android projects.

Dec 12, 2025
4 min read
Discover the best React Native component library for your next project. We compare top libraries on performance, customization, and real-world use cases.

Dec 11, 2025
4 min read
Discover how to choose the right React Native UI kit. This guide covers top kits, selection criteria, and customization to accelerate your app development.

Dec 10, 2025
4 min read
Explore our in-depth guide to find the best React Native UI library. We compare top contenders to help you choose the right fit for your project.

Dec 09, 2025
4 min read
Discover a practical approach to building apps with React Native. This guide covers setup, UI, state management, and testing to help you ship great apps.

Dec 08, 2025
4 min read
android login with facebook: Learn to set up the Facebook SDK, manage tokens, and implement secure authentication across native Android, cross-platform apps.

Dec 07, 2025
4 min read
Master the alert in React Native. Learn to handle platform differences, build custom modals, and apply best practices for a seamless user experience.

Dec 06, 2025
4 min read
keyboardavoidingview react native: Master keyboard handling with KeyboardAvoidingView across iOS, Android, Expo, and TypeScript.

Dec 05, 2025
4 min read
A practical guide to implementing a React Native PDF viewer. Learn to compare libraries, handle native setup, and troubleshoot common issues with real code.

Dec 04, 2025
4 min read
how to validate startup idea: learn proven methods like customer interviews, MVPs, and metrics to confirm market fit.

Dec 03, 2025
4 min read
how to make app like uber: Learn core features, tech stack, development steps, testing, and launch tips.

Dec 02, 2025
4 min read
Build a rock-solid React Native setup. This guide covers Expo vs. Bare workflows, TypeScript, pnpm monorepos, NativeWind, and deployment strategies.

Dec 01, 2025
4 min read
A practical guide to Stripe React Native integration. Learn to set up your server, build payment UIs, handle webhooks, and launch secure mobile payments.

Nov 30, 2025
4 min read
Learn how to master push notifications in React Native. This guide covers setup, best practices, and advanced techniques for engaging your users.

Nov 29, 2025
4 min read
Build powerful location-based apps with our practical guide to react native with google maps. Get setup guides, pro tips, and best practices for iOS & Android.

Nov 28, 2025
4 min read
Explore deep linking react native with a practical guide to configuring URL schemes, universal links, navigation, and testing for Expo and bare apps.

Nov 28, 2025
4 min read
A practical guide to building a scalable React Native design system. Learn to implement tokens, theming, and tools like NativeWind and gluestack-ui.

Nov 26, 2025
4 min read
Learn why react native expo templates speed up your projects with ready-made patterns and practical tips.

Nov 25, 2025
4 min read
Discover how to improve developer productivity with actionable strategies for workflow, tooling, and culture. A practical guide for software engineering teams.

Nov 24, 2025
4 min read
Discover the best cross platform app development tools. Compare top frameworks like Flutter and React Native to build and ship apps faster.

Nov 23, 2025
4 min read
This Expo React Native tutorial provides a hands-on guide to building cross-platform apps. Learn setup, styling with NativeWind, navigation, and deployment.

Nov 22, 2025
4 min read
Build beautiful UIs faster with this guide to Tailwind CSS React Native. Learn setup, styling, and advanced techniques with NativeWind for mobile apps.

Nov 21, 2025
4 min read
Explore our curated list of 7 top-tier React Native app examples. Discover production-ready templates and resources to build your next app faster.

Mar 19, 2025
4 min read
gluestack market offers React Native UI templates to accelerate development. Get customizable, production-ready React Native app templates and Ui kit, some free. Build faster & smarter today!
