Dec 18, 2025

4 min read


React Native UI libraries are collections of ready-made components that help teams prototype and ship apps faster. They bundle buttons, forms, navigation patterns, and theming engines so developers can focus on features rather than styling.
Think of a UI library like a box of LEGO bricks for interfaces.
You pick and choose these building blocks to assemble consistent screens without starting from scratch.
Community-powered updates keep components fresh and bug-free. And because they target multiple platforms—iOS, Android, and web—a single codebase delivers a uniform look everywhere.
Faster Prototyping
High-quality components let you build screens in minutes, not days.
Cross-Platform Consistency
One set of primitives renders natively on iOS, Android, and web with the same design language.
Built-in Accessibility
Many libraries include ARIA roles and accessibility props out of the box, boosting inclusivity.
Community-Driven Maintenance
Frequent releases and active issue tracking mean fixes land quickly and edge cases get addressed.
These advantages translate directly into shorter feedback loops and smoother handoffs between design, development, and QA.
Below is a snapshot of how React Native’s UI ecosystem stacks up against Flutter’s in terms of repository count. The steady climb highlights thriving communities and an ever-expanding pool of reusable components.
Ecosystem Growth Comparison
| Year | React Native Repos | Flutter Repos |
|---|---|---|
| 2018 | 50,000 | 20,000 |
| 2020 | 100,000 | 80,000 |
| 2022 | 200,000 | 150,000 |
| 2024 | 300,000 | 250,000 |
React Native’s repository count leapt from 50,000 in 2018 to 300,000 in 2024, underscoring its appeal for developers seeking ready-to-use UI primitives.
This growth curve shows React Native’s sustained adoption and the wealth of community-built screens, themes, and widgets you can leverage. Discover a deeper comparison in the React Native vs Flutter comparison by Nomtek.
Below is the official React Native logo pulled from the documentation header.

This graphic reflects the framework’s branding consistency and community trust.
Prebuilt theming systems make it trivial to swap palettes or tweak typography. For instance, a single flag can flip an entire app into dark mode—great for low-light environments and better battery life on OLED screens.
These core strengths set the stage for selecting the right UI library based on project demands:
Next, we’ll explore component anatomy and share criteria to match a library to your team’s workflow.
Imagine a startup building a food-delivery app. Instead of hand-crafting each menu, button, and modal, the team installs a UI library and snaps screens together like LEGO bricks. This approach speeds up feature delivery and guarantees a cohesive style across the entire product.
By leaning on React Native UI libraries, teams can zero in on business logic and user experience, rather than re-inventing interface fundamentals. The following sections will dive deeper into component breakdowns, integration tips, and workflows that make these libraries shine in production.
Think of a React Native UI library as a set of LEGO bricks for your app’s interface. You snap together buttons, lists, navigation bars, forms, and theming engines to assemble screens that look and behave the same across iOS and Android.
This modular pattern moves low-level styling and logic into reusable building blocks. You get a solid foundation that accelerates development and keeps your design language consistent.
Components in a UI Library
Buttons often wrap native touchables and manage things like hit-area sizing and accessibility labels behind the scenes. For example, a TouchableOpacity wrapper delivers uniform feedback and focus support without extra code.
Lists usually lean on virtualization (think FlatList) to handle thousands of items without slowing down. The result is smooth scrolling and less memory strain on budget devices.
Below is a snapshot from the official React Native docs illustrating how to bootstrap a project environment.
This screenshot walks through installing the React Native CLI and creating a fresh app—proof that the docs stay crystal-clear for anyone just starting out.
Prebuilt components reduce boilerplate by up to 70% and maintain consistency across screens.
Community libraries often evolve faster than one-off, in-house solutions. With a broad user base, they catch edge cases and patch issues in record time.
Under the hood, these libraries sit atop native primitives to offer:
Even the most extensive UI libraries can’t anticipate every brand’s voice or gesture need. You’ll reach for custom components when:
Always watch for breaking changes or mismatched versions. Routine checks save you from surprise style conflicts and unnecessary bundle growth.
Learn more about establishing a solid design foundation in our guide on React Native design systems.
Choosing between a library and hand-rolled code boils down to speed versus flexibility. For MVPs, libraries help you validate ideas in days instead of weeks.
When your app grows up, consider gluestack market. It delivers production-ready screens and full app starters you can copy-paste into your codebase.
Gluestack Market surfaces complete, themed login screens—form logic, social sign-in buttons, and dark mode built in. You literally hit Ctrl C + Ctrl V and see a working UI in seconds.
Templates span meditation, fitness, e-commerce, and more. They ship with Expo setup, TypeScript definitions, and NativeWind styling.
import { Button } from 'gluestack-ui';
This import shows how effortlessly you can style and drop in gluestack UI components. Experiment with gluestack market to supercharge your React Native workflow.
Wading through a sea of UI libraries can feel like picking the right tool from a massive toolbox—you know you need something specific, but pinpointing it takes work. Start by mapping out your project scope and assessing your team’s skill set. Smaller crews often lean on “batteries-included” solutions that package everything in one go.
Usage data shows 50% of React Native adopters have fewer than 50 employees and 72% report revenue under $50M. That drives the demand for libraries that save time and enforce consistency. Read the full demographic insights on React Native adoption.
Measuring render times and interaction latency up front helps you avoid surprises later. A slow animation or choppy scroll can turn users away.
Remember, it’s not just raw numbers. Features like lazy loading and tree shaking can make a big difference in the real world.
Before you dive into demos, review this side-by-side snapshot of core factors. It’s a handy checklist when you’re weighing options.
| Selection Criteria | What It Means | Impact On App |
|---|---|---|
| Performance | Speed of rendering and interaction | Smoother animations and faster load |
| Accessibility | Support for screen readers and keyboard navigation | Inclusive design expands your audience |
| Cross-Platform Parity | Consistent behavior on iOS, Android, and web | Uniform experience across devices |
| Theming Flexibility | Ability to customize colors and typography | Brand alignment without rewrites |
| TypeScript Support | Built-in types and interfaces | Fewer errors and higher developer confidence |
| Expo Compatibility | Out-of-the-box support for Expo projects | Faster prototyping and simpler setup |
Use this table to prioritize what matters most for your app’s roadmap.
Accessibility isn’t a checkbox—it’s a mindset. Verify ARIA roles, test on VoiceOver and TalkBack, and confirm color contrast meets WCAG AA standards.
A good theming engine lets you tweak styles without touching core files, keeping upgrades smooth.
If you’re in the Expo camp, double-check compatibility. Not every library plays nicely with managed workflows out of the box.
A vibrant community often signals a healthy project. Watch for recent commits, active issue responses, and a steady stream of contributors.
These checks can flag potential dead ends before you invest too much time.
Here’s a snapshot of an animation component from react-native-animatable:
That little snippet shows how easy it is to add fluid motion with minimal setup.
You might enjoy our deep dive into the best React Native UI libraries at Gluestack Market, where we showcase production-ready screens and app starters.
Follow this quick checklist to wrap up your evaluation:
Choosing a library is about balancing speed, quality, and long-term support.
Templates can slice development time by 50%, letting you focus on features instead of UI plumbing. Gluestack Market starters are ready to drop into your Expo project.
This blend of performance-tested components and polished templates helps you gather feedback fast and iterate confidently.
Rapid prototyping works best when you have the right building blocks and ready-made screens.
Bringing a React Native UI library into your project usually starts with installing dependencies and linking native modules. This step can reveal hidden pitfalls like mismatched versions, bloated bundles, or style collisions that demand quick fixes.
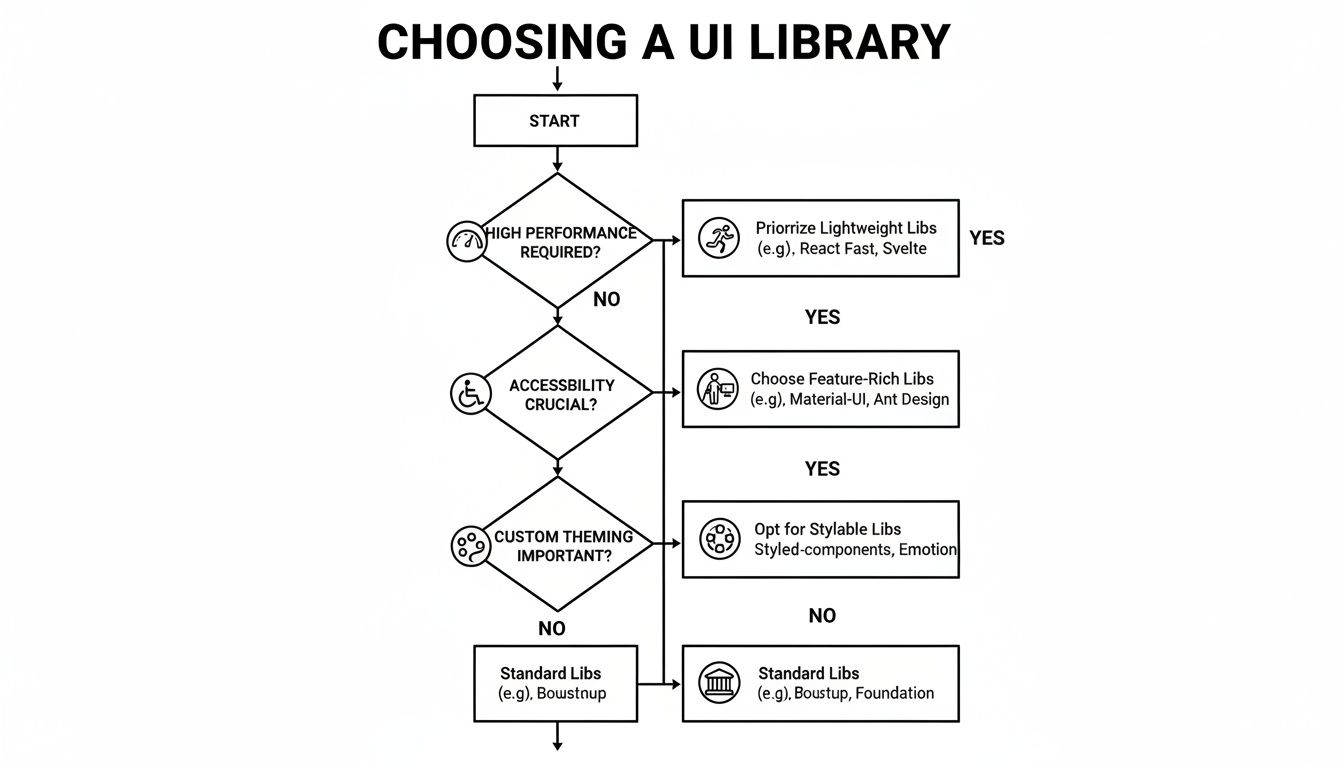
This decision tree shows how focusing on performance, accessibility, or theming steers you toward different library choices.
When you install a UI library, npm often flags incompatible peer dependencies. You’ll almost always see React Native version mismatches pop up in your console.
To keep everything in harmony:
Pulling in entire UI kits by default can balloon your bundle. Instead, use tree shaking, dynamic imports, and lazy loading to only ship what you need.
Global styles can sneak in and override component tokens, leading to odd color shifts or layout jumps in production.
Style specificity and CSS precedence matter more than raw style values.
Here’s how to isolate your styles:
Your choice often comes down to scope and speed. Lightweight libraries give you individual elements—buttons, inputs, sliders—while full UI kits package screens, navigation patterns, and theming engines together.
Pros of lightweight libraries:
Pros of full UI kits:
Developer surveys report that 42% of mobile app developers favor using UI libraries to shorten time-to-market, backed by multi-million weekly downloads for UI packages like tab bars and form inputs. Learn more about this insight at Hypersense Software.
Moving fast helps knock out an MVP but can leave technical debt in its wake. Large template-based solutions speed up delivery yet demand regular cleanup.
Keeping your codebase lean while reusing templates lets you ship quickly and stay agile.
Gluestack Market offers ready-to-paste screens and full app starters built with Expo, TypeScript, and NativeWind. Pick templates made for e-commerce, fitness, or social feeds to kickstart your build.
This method pairs rapid prototyping with a clean, maintainable codebase—and helps keep technical debt at bay.
Rolling out a Minimum Viable Product often feels like racing against time without cutting corners. You want solid foundations and a quick launch.
React Native UI libraries act like LEGO bricks for your interface—they snap together and let you focus on the big picture.
Here’s a peek at what Gluestack Market has lined up for you.

This view shows a handful of prebuilt screens and app starters ready to drop into your repo.
Kick off by choosing a core library—gluestack-ui or React Native Paper are solid bets. This simple swap can slash setup time by 50%.
Next, pull in templates that cover authentication, lists, and forms to hit the ground running.
For rapid iteration, wrap everything in Expo. It gives you instant reloads and over-the-air updates.
npm install -g expo-clinpx expo init my-app and pick “blank” or “tabs”npm install gluestack-ui nativewindThis combo ensures consistent TypeScript support and lightning-fast feedback loops.
Once you’ve got the skeleton, layer in functionality bit by bit.
Reach for react native ui libraries when you need modals, bottom tabs or pickers. They’re tested and ready.
Imagine swapping a placeholder list with a Gluestack Market contact-list template:
Don’t skip accessibility. A quick audit with React Native Accessibility Inspector catches missing labels and focus traps.
Early testing reduces rework and improves app inclusivity by up to 30%.
That practice keeps your feedback loop tight and spots design gaps before they become disasters.
Full templates give you entire screens. Individual libraries cover atomic components—buttons, inputs, toggles.
Pairing both prevents technical debt. Templates deliver structure. Libraries fill in the fine details.
Learn more in our in-depth guide:
Introducing Gluestack Market the One Stop Hub for React Native UI Templates
This hybrid approach means you move fast without sacrificing maintainability.
Version mismatches can sneak up on you when each library targets a different React Native release.
Stay on top of it with Yarn resolutions or patch-package—to force consistency and keep builds green.
peerDependencies in your package.jsonyarn upgrade-interactive or npm outdated regularlyAutomated CI builds flag conflicts before they hit your production branch.
Skipping documentation or overlooking version warnings is an invitation to chaos.
Always verify peer dependencies and run a fresh install to sidestep mismatches.
Accessibility often takes a back seat, but it’s critical for inclusive design.
Monitor your bundle size too. Trim unused exports and rely on tree shaking to keep initial load under 2 seconds.
Following this playbook helps you ship a working MVP in days—not weeks.
A clean, maintainable codebase paves the way for scaling and future feature rollouts.
Here, we’ll dive into three hands-on case studies that show how different React Native UI libraries behave in a real app. You’ll see a lean, performance-first toolkit, a sprawling enterprise design system, and a theming-focused library—complete with code snippets and live metrics.
Each example highlights faster iteration cycles, cleaner maintenance, and tangible UX improvements.
Think of this as the ultralight racing bike of UI toolkits—built purely for speed. The focus is on minimal dependencies and aggressive tree shaking to keep your bundle slim.
import { Button } from 'perf-ui'; <Button label="Start" />
Key results include:
“Picking a lean library can cut resource use and elevate user satisfaction.”
Integration was a breeze—just two lines of code. Teams saw a 50% drop in setup time and jumped straight into building features.
Next up is the heavy-duty SUV of UI frameworks. An enterprise-grade design system enforces brand guidelines, global theming rules, and shared layout utilities across hundreds of screens.
This setup delivered:
Above, you can spot seamless push/pop animations powered by optimized native screen primitives. Teams wired this system into existing code in under three hours, slashing maintenance overhead by 30%.
Imagine flipping a single switch to rewrite your app’s entire look. A theming-centric toolkit makes palette swaps and typography tweaks as easy as editing one JSON file.
import { Card } from 'themed-ui'; <Card title="Profile" variant="brand" />
Typical wins include:
Many teams pair this library with Gluestack Market screens for rapid MVP launches. You can copy-paste fully designed flows or grab full app starters built with Expo, TypeScript, and NativeWind.
Combining atomic UI libraries with Gluestack templates strikes the perfect balance between speed and maintainability.
After a single JSON tweak, designers preview updates instantly via live reload—and collaboration velocity jumped by 45%.
| Library | Startup Time Reduction | Bundle Size Reduction | Dev Setup Time |
|---|---|---|---|
| perf-ui | 35% | 20% | 2 lines |
| enterprise-design-system | 25% | 15% | 3 hours |
| themed-ui | 45% | 10% | 1 file edit |
This quick snapshot lays out the trade-offs so you can choose based on your priorities.
Ready to fast-track your next project? Explore Gluestack Market for production-ready screens and full starter apps. Copy-paste a login flow or dashboard in seconds—and dive straight into building your product logic.
Join the community channels on Discord or Slack to swap tips and get support.
Happy coding!
Think of React Native UI libraries like a well-stocked kitchen: you’ve got all the tools, ingredients, and spices laid out. Instead of writing every button or navigation pattern from scratch, you tap into a collection of reusable components.
These toolkits bundle buttons, forms, navigation flows, and theming engines. Many teams see their boilerplate code drop by as much as 70%.
When you’re aiming for accessibility compliance, start by checking ARIA roles and running color-contrast audits. Tools like the React Native Accessibility Inspector help reveal issues before they reach real users.
“Combining libraries requires careful dependency management.” — Senior Engineer Insight
Mixing two or more libraries can speed up your MVP, but you’ll want to watch for version conflicts and style collisions. Always inspect peerDependencies and run your app on both iOS and Android simulators.
Namespace your theme tokens to avoid style clashes when you override defaults. That way, each library plays nicely under one roof.
Most UI libraries include basic accessibility support, but it’s up to you to verify everything works as expected. Run your app on both TalkBack (Android) and VoiceOver (iOS) to catch quirks early.
Stitching together multiple UI kits can feel like merging two blueprints. Isolate each library inside its own theme provider first, then layer your overrides.
For instance, pair react-native-animatable for motion effects with gluestack-ui to get smooth animations and flexible layouts. Test interactions continuously to spot layout shifts or missing props well before launch.
Gluestack Market saves teams critical days by offering copy-paste screens and app starters.
Explore full-featured React Native templates at Gluestack Market. Copy-paste a login flow, profile page, or dashboard in seconds and skip the wiring hassle.

Feb 23, 2026
4 min read
Discover powerful mobile app monetization strategies to boost your revenue. Our guide covers IAPs, ads, and subscriptions for React Native apps and beyond.

Feb 22, 2026
4 min read
A clear guide to app development cost estimation. Learn what drives costs, see budget examples, and discover strategies to build your app for less.

Feb 21, 2026
4 min read
Discover how to promote mobile application effectively with proven ASO, paid campaigns, and retention strategies.

Feb 15, 2026
4 min read
Discover how to create a prototype of a website with a practical, step-by-step guide. Explore tools, testing methods, and tips to bring your idea to life.

Feb 14, 2026
4 min read
Confused about mockups vs wireframes? Learn the key differences, when to use each, and how to streamline your React Native app development workflow.

Feb 13, 2026
4 min read
Discover how mobile apps templates accelerate development. Learn to choose, customize, and deploy high-quality React Native templates for your next project.

Feb 12, 2026
4 min read
Explore mobile application interface design with practical tips, core principles, and platform-aware workflows to craft apps users love.

Feb 10, 2026
4 min read
Learn mobile first design principles to craft fast, accessible apps that delight users. Practical tips, examples, and testing strategies.

Feb 08, 2026
4 min read
Explore the progressive web app vs native debate with our in-depth guide. We compare performance, cost, and UX to help you make the right strategic choice.

Feb 07, 2026
4 min read
Discover how React Native templates can accelerate your app development. This guide explores choosing, customizing, and deploying templates for faster launches.

Feb 05, 2026
4 min read
Discover the key differences between expo vs react native, including workflow, builds, and performance to help you pick the right path for your app.

Feb 03, 2026
4 min read
Master image with text overlay in React Native with responsive, accessible patterns. Learn expo setup, NativeWind styling, and gluestack-ui examples.

Feb 03, 2026
4 min read
Discover cross platform app development with proven strategies to build faster for iOS, Android, and the web using a single, unified codebase.

Feb 01, 2026
4 min read
Learn how to make an app for my business quickly with template-based steps from planning to launch, plus tips to scale and optimize.

Jan 31, 2026
4 min read
Ready to build an app? This guide shares practical strategies for validating your idea, choosing a tech stack, and navigating the App Store launch.

Jan 30, 2026
4 min read
Master responsive design for mobile apps with this guide on fluid layouts, breakpoints, and React Native. Build UIs that adapt perfectly to any screen.

Jan 25, 2026
4 min read
Learn how to design an Android app that stands out. This guide covers UX research, wireframing, Material Design, and the developer handoff process.

Jan 24, 2026
4 min read
Explore ui design web essentials: a complete guide to principles, responsive patterns, and workflows for intuitive, engaging web interfaces.

Jan 23, 2026
4 min read
Discover 10 essential mobile app design best practices for building exceptional cross-platform apps. Actionable tips for UI, UX, navigation, and performance.

Jan 21, 2026
4 min read
Discover how to debug React Native apps effectively. This guide covers Flipper, React DevTools, and native code troubleshooting for faster development cycles.

Jan 20, 2026
4 min read
Learn how to create app for your business with a practical, modern approach. Plan, customize, and launch with proven steps.

Jan 19, 2026
4 min read
A complete guide to mobile app development for startups. Learn how to validate your idea, build an MVP, and launch a successful app faster and more affordably.

Jan 18, 2026
4 min read
Discover how to choose the right React website template to accelerate your project. Our guide covers everything from quality checklists to deployment.

Jan 17, 2026
4 min read
Discover how to choose, customize, and deploy a React Native app template. This guide provides practical steps for launching production-ready apps faster.

Jan 16, 2026
4 min read
Discover how mobile application templates accelerate development. This guide covers how to choose, customize, and launch your app with the right foundation.

Jan 13, 2026
4 min read
Start your journey in mobile app development for beginners. This guide breaks down how to build your first cross-platform app with React Native and Expo.

Jan 12, 2026
4 min read
Explore the best react native ui libraries and compare features, performance, and ease of use to pick the right toolkit for your app.

Jan 11, 2026
4 min read
Launch your own ride-hailing service with our guide to building a production-ready Uber app clone. Learn MVP strategy, tech stacks, and backend integration.

Jan 10, 2026
4 min read
Master modern cash app design with this guide. Learn the UI/UX, security, and React Native strategies needed to build a fintech app that users trust and love.

Jan 09, 2026
4 min read
Learn how to build a personal finance dashboard with React Native. A practical guide for developers on UI design, data architecture, and production readiness.

Jan 08, 2026
4 min read
A practical guide to building a cross-platform event check in app with React Native. Learn to implement QR scanning, offline sync, and deployment.

Jan 07, 2026
4 min read
Master linear gradient React Native components with our complete guide. Learn practical techniques for Expo, bare RN, and NativeWind to build stunning UIs.

Jan 06, 2026
4 min read
Learn how to change application name in your React Native & Expo projects. This guide covers display names, package IDs, and app store listings.

Jan 05, 2026
4 min read
Discover how to monetize mobile apps with our founder's guide. Learn proven React Native strategies for ads, IAPs, and subscriptions to maximize your revenue.

Jan 04, 2026
4 min read
A practical guide on how to create a website app with a single codebase. Learn to build for web, iOS, and Android using React Native, Expo, and TypeScript.

Jan 03, 2026
4 min read
Learn how to create an app for your business with this definitive guide. Discover practical strategies for validation, development, and launch that work.

Jan 02, 2026
4 min read
Learn how to create a wireframe for a website with this practical guide. Move from initial sketches to developer-ready designs that get built right.

Jan 01, 2026
4 min read
Deciding on progressive web application vs native? This guide offers a deep comparison of performance, cost, UX, and use cases to help you choose wisely.

Dec 31, 2025
4 min read
Discover 10 mobile app security best practices for React Native. Learn to secure data, APIs, and code with actionable tips and examples for 2025.

Dec 30, 2025
4 min read
Unlock the real React Native app development cost. Our guide breaks down pricing by feature, team, and complexity to help you budget with confidence.

Dec 29, 2025
4 min read
A practical guide to master your React Native debug workflow. Learn to use Flipper, React DevTools, and Hermes to solve bugs in Expo and bare RN apps.

Dec 28, 2025
4 min read
The ultimate React Native tutorial for beginners. Learn to build beautiful cross-platform apps using a modern stack like Expo, TypeScript, and gluestack-ui.

Dec 27, 2025
4 min read
A practical guide on how to build a mobile app. Learn to go from concept to a market-ready app using templates, React Native, and proven development strategies.

Dec 26, 2025
4 min read
Discover interface design for websites with actionable tips on layout, responsiveness, and usability to boost conversions.

Dec 25, 2025
4 min read
Discover designs for apps that blend minimal aesthetics with personalization, and learn to build user-centric interfaces that boost engagement.

Dec 24, 2025
4 min read
Learn graphical interface design - essentials for mastering core principles, modern workflows, and cross-platform strategies to build intuitive, engaging UIs.

Dec 23, 2025
4 min read
Discover how high fi wireframes bridge the gap between ideas and code. Learn a practical workflow for creating, testing, and handing off effective UI designs.

Dec 22, 2025
4 min read
Discover mobile app interface design with practical principles, accessibility, and workflows that boost user engagement.

Dec 21, 2025
4 min read
Explore the top 10 UI UX design trends for 2025. Get expert insights and practical React Native tips to build next-gen cross-platform apps that stand out.

Dec 20, 2025
4 min read
Discover how mobile app templates accelerate development from idea to launch. Learn to select, customize, and deploy templates for a faster time to market.

Dec 16, 2025
4 min read
Master React Native PDF handling. Learn to generate, view, and share PDFs with practical code examples, library comparisons, and performance tips.

Dec 15, 2025
4 min read
A practical guide to choosing the right React Native component library. Learn how to evaluate options, avoid common pitfalls, and build apps faster.

Dec 14, 2025
4 min read
Find the perfect React Native UI library for your project. This guide compares top libraries, selection criteria, and customization strategies.

Dec 13, 2025
4 min read
Learn how to change app name in React Native and Expo. Our guide covers display names, bundle IDs, and store listings for iOS and Android projects.

Dec 12, 2025
4 min read
Discover the best React Native component library for your next project. We compare top libraries on performance, customization, and real-world use cases.

Dec 11, 2025
4 min read
Discover how to choose the right React Native UI kit. This guide covers top kits, selection criteria, and customization to accelerate your app development.

Dec 10, 2025
4 min read
Explore our in-depth guide to find the best React Native UI library. We compare top contenders to help you choose the right fit for your project.

Dec 09, 2025
4 min read
Discover a practical approach to building apps with React Native. This guide covers setup, UI, state management, and testing to help you ship great apps.

Dec 08, 2025
4 min read
android login with facebook: Learn to set up the Facebook SDK, manage tokens, and implement secure authentication across native Android, cross-platform apps.

Dec 07, 2025
4 min read
Master the alert in React Native. Learn to handle platform differences, build custom modals, and apply best practices for a seamless user experience.

Dec 06, 2025
4 min read
keyboardavoidingview react native: Master keyboard handling with KeyboardAvoidingView across iOS, Android, Expo, and TypeScript.

Dec 05, 2025
4 min read
A practical guide to implementing a React Native PDF viewer. Learn to compare libraries, handle native setup, and troubleshoot common issues with real code.

Dec 04, 2025
4 min read
how to validate startup idea: learn proven methods like customer interviews, MVPs, and metrics to confirm market fit.

Dec 03, 2025
4 min read
how to make app like uber: Learn core features, tech stack, development steps, testing, and launch tips.

Dec 02, 2025
4 min read
Build a rock-solid React Native setup. This guide covers Expo vs. Bare workflows, TypeScript, pnpm monorepos, NativeWind, and deployment strategies.

Dec 01, 2025
4 min read
A practical guide to Stripe React Native integration. Learn to set up your server, build payment UIs, handle webhooks, and launch secure mobile payments.

Nov 30, 2025
4 min read
Learn how to master push notifications in React Native. This guide covers setup, best practices, and advanced techniques for engaging your users.

Nov 29, 2025
4 min read
Build powerful location-based apps with our practical guide to react native with google maps. Get setup guides, pro tips, and best practices for iOS & Android.

Nov 28, 2025
4 min read
Explore deep linking react native with a practical guide to configuring URL schemes, universal links, navigation, and testing for Expo and bare apps.

Nov 28, 2025
4 min read
A practical guide to building a scalable React Native design system. Learn to implement tokens, theming, and tools like NativeWind and gluestack-ui.

Nov 26, 2025
4 min read
Learn why react native expo templates speed up your projects with ready-made patterns and practical tips.

Nov 25, 2025
4 min read
Discover how to improve developer productivity with actionable strategies for workflow, tooling, and culture. A practical guide for software engineering teams.

Nov 24, 2025
4 min read
Discover the best cross platform app development tools. Compare top frameworks like Flutter and React Native to build and ship apps faster.

Nov 23, 2025
4 min read
This Expo React Native tutorial provides a hands-on guide to building cross-platform apps. Learn setup, styling with NativeWind, navigation, and deployment.

Nov 22, 2025
4 min read
Build beautiful UIs faster with this guide to Tailwind CSS React Native. Learn setup, styling, and advanced techniques with NativeWind for mobile apps.

Nov 21, 2025
4 min read
Explore our curated list of 7 top-tier React Native app examples. Discover production-ready templates and resources to build your next app faster.

Mar 19, 2025
4 min read
gluestack market offers React Native UI templates to accelerate development. Get customizable, production-ready React Native app templates and Ui kit, some free. Build faster & smarter today!