Jan 11, 2026

4 min read

So, you’re thinking about building an app like Uber. At its core, an Uber app clone is a system that connects passengers with drivers on demand. It's not a single app, but a whole ecosystem: one app for riders, another for drivers, and a central admin panel to keep everything running smoothly.
But let's be clear—this isn't about just copying Uber feature-for-feature. The real opportunity is in finding a specific market need and building a solution that serves it perfectly.

It’s easy to look at giants like Uber and think the ship has sailed. But that’s a mistake. The key isn't to compete head-on; it's to specialize.
The global taxi market is still growing, thanks to more people moving to cities and using their phones for absolutely everything. This growth opens up countless doors for smaller, focused players who can cater to specific communities or offer something unique that the big guys overlook.
Between the early 2010s and today, ride-hailing apps completely reshaped the taxi industry, turning a fragmented, offline business into a tech-driven powerhouse. According to Mordor Intelligence, the global taxi market is on track to hit around USD 347.86 billion by 2030. With Uber alone serving 189 million monthly users, the demand is clearly not going anywhere.
Success in this space comes down to one thing: differentiation. Instead of trying to build the next Uber for everyone, focus on a specific group of people with a specific need. This is how you turn a simple "clone" into a genuinely valuable service.
Not sure where to start? Think about these angles:
The goal is to solve one problem exceptionally well. Before you write a single line of code, you absolutely must validate your idea. We actually have a great guide on how to validate a startup idea that walks you through the practical steps.
The most successful clones aren't clones at all. They are new businesses that use a proven model as a launchpad for a specialized service. Your unique selling proposition is your most important asset.
Every ride-hailing platform, no matter how niche, rests on three interconnected pillars. Each one serves a different user, and they all have to work together perfectly to create a reliable experience.

Here’s the biggest trap I see people fall into when building an uber app clone: they try to build everything right out of the gate. That's a surefire way to blow your budget, get stuck in endless development cycles, and end up with a project that never sees the light of day.
The smart money is on starting with a Minimum Viable Product (MVP).
Think of an MVP as the leanest, most focused version of your app. It has just enough features to solve the core problem for your very first users. This isn't about launching something that’s broken or incomplete. It's about launching something that does one thing incredibly well. The real goal here is to get your app into the hands of real people, fast. You can then gather feedback and build what users actually want, not just what you think they want.
This approach forces you to be ruthless with prioritization, which is a massive advantage. You avoid pouring time and money into shiny "nice-to-have" features that don't add to the core mission: getting a rider from point A to point B safely and efficiently. Everything else is just noise, at least for now.
For a deeper dive, check out this great resource on What is MVP in Software Development. It really lays out the strategic thinking behind this approach.
To get this right, you need to break the app down into its essential components: the Rider App, the Driver App, and the Admin Panel that runs the whole show.
Here’s a practical checklist to keep your MVP focused. It breaks down the non-negotiable features for each part of your platform, ensuring you build a solid foundation without getting sidetracked.
| Component | Must-Have Feature | Primary Goal |
|---|---|---|
| Rider App | Simple Onboarding & Profile | Get users signed up and ready to book in under a minute. |
| Real-Time Geolocation & Booking | Let users see nearby drivers and request a ride instantly. | |
| Fare Estimation | Build trust by showing the estimated cost upfront. | |
| In-App Payments | Ensure a smooth, cashless, and secure transaction. | |
| Driver App | Easy Registration & Profile | Quickly onboard drivers and verify their documents. |
| Availability Toggle (Online/Offline) | Allow drivers to control when they receive ride requests. | |
| Ride Request Management | Clearly display new requests for drivers to accept/reject. | |
| In-App Navigation | Guide drivers efficiently to pickup and drop-off points. | |
| Earnings Tracker | Give drivers a clear view of their income. | |
| Admin Panel | Driver Management & Verification | Maintain quality and safety by vetting all drivers. |
| Real-Time Trip Monitoring | Oversee all active rides for support and safety. | |
| Fare & Commission Management | Control the platform's business logic and revenue. | |
| Basic User Support System | Provide a way to handle issues and resolve disputes. |
By sticking to this list, you're building a complete, functional ecosystem that delivers real value from day one.
A rider's first impression is everything. If booking a ride feels like a chore, they’ll just open a competitor's app. Your MVP has to be absolutely frictionless.
This means a super-fast signup using an email or social login. The profile should be minimal—just name, phone number, and a payment method. The app has to instantly find their location with GPS, let them pop in a destination, see nearby drivers on a live map, and book with a single tap. Crucially, show an estimated fare before they confirm. It builds trust and avoids surprises.
Don’t forget: your drivers are your partners. Their app needs to be a reliable tool that makes their job easier, not a frustrating obstacle. The MVP for drivers is all about efficiency.
They need a simple way to register, upload their documents for approval, and go online or offline with a switch. When a ride request comes in, it needs to be crystal clear: pickup location, destination, and estimated fare. Turn-by-turn navigation is a must, as is a simple dashboard where they can track their earnings.
This is the part your users will never see, but it’s the heart of your entire operation. An MVP admin panel doesn’t need fancy AI-powered analytics, but it absolutely requires the essentials to run the business.
You need to be able to approve or reject new driver applications. You need to see all ongoing trips on a map in real-time. And you need to be able to manage your fare structures and commission rates. Finally, a basic system for handling support tickets is non-negotiable. This is the toolkit that keeps your platform safe, functional, and ready to scale.
Let's be real: building a ride-hailing app from scratch is a beast of a project. The traditional path means months of design, coding, and testing, which can burn through your budget before you even have a single user. A much smarter way to play the game is to start with a production-ready React Native template.
This approach lets you sidestep the most grueling parts of front-end development. Instead of agonizing over every screen, component, and user interaction, you're starting with a solid, well-built foundation. This doesn't just put you on the fast track; it dramatically lowers the risk of the whole venture.
The numbers don't lie. Building an Uber-like product from the ground up can cost anywhere from $70,000 to over $250,000, depending on how complex you want to get. Some industry breakdowns show a standard taxi clone running $40,000–$60,000, with more feature-rich versions easily topping $300,000. These figures make it crystal clear why pre-built templates are so appealing. Shaving off even 30–40% of the front-end work can save you tens of thousands of dollars and months of development time.
Picking the right tech stack is half the battle, and this is where React Native really shines for an uber app clone. It lets you write your code once and ship it to both iOS and Android. That’s like getting two apps for the price of one, effectively halving your development effort for cross-platform support.
Modern templates that come bundled with tools like Expo and TypeScript give you an even bigger leg up. Expo makes the whole build and deployment process feel like magic, while TypeScript adds a safety net to your code, catching annoying bugs before they ever become a problem.
This infographic breaks down the different routes you can take, from starting from zero to jumping ahead with a template.
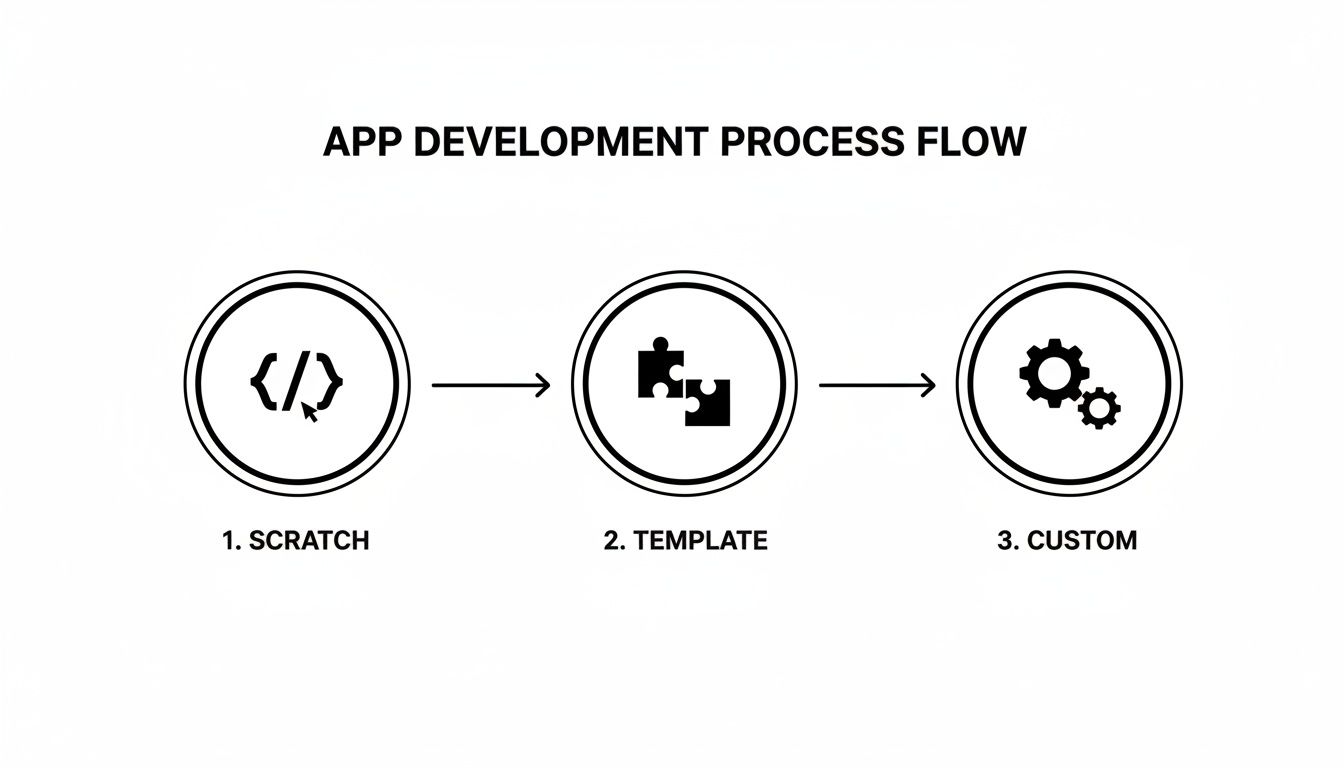
As you can see, a template hits that sweet spot—it gives you the speed of a pre-built solution but with all the flexibility you need to make it your own.
By starting with a template, you're gifted a clean, modern, and maintainable codebase from day one. This frees up your team to pour their energy into what actually matters: the unique business logic, backend services, and marketing that will make your app stand out.
Not all templates are created equal. To make sure you're setting yourself up for success, you need a starter kit that's more than just a collection of pretty screens. A truly high-quality template should be a complete, production-ready solution.
Here's what you should be looking for:
A great template isn't just a UI kit; it's a strategic asset. It handles the grunt work so you can invest your time and money in building a unique product, not reinventing the wheel.
By picking the right foundation, you're not just saving money—you're buying speed and shedding risk. This lets you launch faster, get real user feedback sooner, and start iterating your way to a profitable business. For a deeper dive, check out our guide on selecting the best mobile app templates.
![]()
Alright, your React Native template has given you a solid skeleton—the app has a face and a structure. But right now, it's just a collection of pretty screens. It's time to hook up the backend services and APIs that do all the heavy lifting. This is the moment your app starts to think and act.
The magic of any ride-hailing app is its connection to the real world. This doesn't happen by accident. It's all powered by specialized APIs that manage geolocation, calculate routes, and enable that all-important real-time communication.
The map is the heart of your app. It's where riders pinpoint their location and drivers navigate the city streets. You're going to need a seriously robust mapping service for this, and the two main players in this space are Google Maps and Mapbox.
Getting these into your React Native app means grabbing an API key and using specific libraries to render the map and make the right API calls. The end goal? A user types a few letters of an address, sees a perfect list of suggestions, and gets an instant, accurate route and fare estimate. For a practical walkthrough, check out our guide on using https://market.gluestack.io/blog/react-native-with-google-maps.
You know that slick, real-time view of the driver's car gliding across the map? That's a must-have feature, and it demands a fast, persistent connection between the driver's phone, the rider's phone, and your server.
You have two main paths to get this done:
Let's be clear: a ride-hailing app is an e-commerce app. That means handling payments securely is non-negotiable. You should never handle raw credit card data on your own servers. Instead, you need to plug in a trusted, third-party payment gateway.
Stripe is the go-to for most developers. Their documentation is fantastic, and their mobile SDKs make the whole process surprisingly straightforward.
Here’s what the flow usually looks like:
This process keeps sensitive financial data off your servers, which dramatically reduces your PCI compliance headache. For a deeper dive into different payment processing solutions, it’s always a good idea to see what the industry pros are recommending.
Never, ever compromise on payment security. Using a gateway like Stripe protects your users and your business, which is fundamental to building the trust you need to succeed.
Push notifications are the connective tissue of the user experience. They're the little nudges that keep riders and drivers in the loop from start to finish.
You’ll need notifications for all the key moments:
Services like Firebase Cloud Messaging (FCM) for Android and the Apple Push Notification service (APNS) for iOS are the standards here. The good news is that Expo makes this much easier with its unified Notifications API, which smooths out the platform-specific kinks. Your backend is what pulls the trigger, sending out the right notification at the right time.
You're at the finish line. Or at least, it feels like it. Your Uber app clone is built, the features are working, and the APIs are humming along. It looks and feels like a real product.
But this is the part of the journey where a lot of great app ideas fall apart. The jump from a development build on your machine to a live app in the hands of actual users is a big one. A successful launch isn't about luck; it's the result of being absolutely meticulous about testing, having a smooth deployment process, and knowing exactly what you'll do the moment you go live.
This is about more than just finding crashes. It's about earning and keeping user trust. In the ride-hailing game, you don't get a second chance. A single bug in the payment flow or a five-second lag in real-time tracking can be enough to make a user delete your app forever.
Think of rigorous testing as your insurance policy against a disastrous launch day. An app with as many moving parts as a ride-hailing service—real-time data, payments, user accounts, driver-side logic—needs more than a quick once-over. You need a strategy that covers every layer of the system.
Here's how to break it down:
A critical bug found by a user costs exponentially more to fix—in both money and reputation—than one caught during testing. This phase isn't a box to check; it's a direct investment in your app's future.
Once you're confident your app is solid, it's time to get it into the app stores. If you've been building with React Native and Expo, this part of the process gets a whole lot easier thanks to Expo Application Services (EAS). EAS is designed to handle the most painful parts of app submission.
EAS Build takes your JavaScript code and compiles it into the native .apk (for Android) and .ipa (for iOS) files the stores require. From there, EAS Submit can automate uploading those builds, along with all the necessary metadata, to both the Apple App Store and Google Play Store.
But don't let the automation fool you—you still have to play by the rules. Both Apple and Google are notoriously strict.
| App Store | Common Hurdles to Watch For |
|---|---|
| Apple App Store | Incomplete App Information: Apple hates placeholder text. Make sure your descriptions, screenshots, and privacy details are complete and professional. |
| Login & Demo Access: If your app requires a login, you must provide a working demo account (username/password) for the review team. No exceptions. | |
| Guideline 4.3 - Spam: Your app can't just be a reskinned website or a direct copy of another app. It needs to offer genuine, unique value to pass this check. | |
| Google Play Store | Permissions Declarations: You have to be crystal clear about why your app needs sensitive permissions like background location or camera access. "To make the app work" isn't enough. |
| Content Policy: Make sure you have a clear, easily accessible privacy policy linked within the app and your store listing. Ensure no prohibited content. | |
| App Performance: Google automatically tests for crashes and "Application Not Responding" (ANR) errors. If your app is buggy, it will get flagged and rejected. |
The review process itself can take anywhere from a few hours to several days. Be ready for a potential rejection—it happens. Have your team on standby to make any required fixes quickly.
Getting your app approved and listed isn't the finish line. It's the starting line. Now the real work begins: monitoring performance, keeping things running smoothly, and actually growing your business.
Your post-launch plan should be built around three things:
Jumping into a project like this always kicks up a lot of questions. From the nitty-gritty tech decisions to the bigger picture business strategy, getting clear answers early on can save you a world of hurt later. Let's walk through some of the most common things that come up when you're building an Uber app clone.
This is usually the first question on everyone's mind. The honest answer? It varies wildly. If you were to build a completely custom app from the ground up, you could easily be looking at a bill anywhere from $70,000 to over $250,000. That number depends entirely on how complex your features are and whether you're building for just one platform or both iOS and Android.
That eye-watering price tag is exactly why we're huge believers in starting with a production-ready template. It’s a game-changer. You get to sidestep a huge chunk of the most time-consuming front-end work, which lets you pour your budget into the backend systems and unique features that will actually set your app apart.
Patience is a virtue, especially if you're building from scratch. A realistic timeline for getting a minimum viable product (MVP) off the ground is somewhere in the 6 to 12-month range. That window covers everything: initial sketches, backend development, rigorous testing, and finally getting it onto the app stores. It’s a marathon, not a sprint.
But what if you could turn that marathon into a 10k? Using a pre-built React Native template does just that. It gives you a solid foundation of well-designed screens and pre-linked components, potentially cutting your launch time down to just 2 to 4 months. That speed is a massive competitive advantage. You get to market faster and start getting feedback from real users while your competition is still picking out fonts.
The real win here isn't just launching fast—it's launching smart. A template doesn't just cut down the hours; it de-risks the whole project. You're building on something that's already tested and stable, freeing you up to focus on what makes your service special.
Your technology stack is the foundation of your entire app. It dictates performance, how easily you can scale, and how much of a headache maintenance will be down the road. For a modern ride-hailing app, going with a cross-platform approach is almost always the smartest move.
Here’s a breakdown of a solid, modern tech stack that we'd recommend:
This stack gives you a robust, modern, and scalable foundation to build on.
Short answer: yes, it's perfectly legal. The concept of on-demand ride-hailing isn't something that can be patented. You're free to build an app with similar features.
Here's the crucial part, though: you absolutely cannot use Uber's branding, logo, name, or any of their copyrighted code or design elements. The goal is to create your own unique brand and build your own distinct product. Using a template is totally fine because you're buying a license to use that code as a starting point for your unique app, not just copying someone else's.
And a final pro-tip: always talk to a legal professional about local taxi and transportation regulations. These rules can vary dramatically from one city to the next.
Ready to stop planning and start building? The gluestack market offers a production-ready Taxi Booking App template that gives you the perfect head start. Built with React Native, Expo, and TypeScript, it includes everything you need to launch your own ride-hailing service faster than you ever thought possible.

Feb 23, 2026
4 min read
Discover powerful mobile app monetization strategies to boost your revenue. Our guide covers IAPs, ads, and subscriptions for React Native apps and beyond.

Feb 22, 2026
4 min read
A clear guide to app development cost estimation. Learn what drives costs, see budget examples, and discover strategies to build your app for less.

Feb 21, 2026
4 min read
Discover how to promote mobile application effectively with proven ASO, paid campaigns, and retention strategies.

Feb 15, 2026
4 min read
Discover how to create a prototype of a website with a practical, step-by-step guide. Explore tools, testing methods, and tips to bring your idea to life.

Feb 14, 2026
4 min read
Confused about mockups vs wireframes? Learn the key differences, when to use each, and how to streamline your React Native app development workflow.

Feb 13, 2026
4 min read
Discover how mobile apps templates accelerate development. Learn to choose, customize, and deploy high-quality React Native templates for your next project.

Feb 12, 2026
4 min read
Explore mobile application interface design with practical tips, core principles, and platform-aware workflows to craft apps users love.

Feb 10, 2026
4 min read
Learn mobile first design principles to craft fast, accessible apps that delight users. Practical tips, examples, and testing strategies.

Feb 08, 2026
4 min read
Explore the progressive web app vs native debate with our in-depth guide. We compare performance, cost, and UX to help you make the right strategic choice.

Feb 07, 2026
4 min read
Discover how React Native templates can accelerate your app development. This guide explores choosing, customizing, and deploying templates for faster launches.

Feb 05, 2026
4 min read
Discover the key differences between expo vs react native, including workflow, builds, and performance to help you pick the right path for your app.

Feb 03, 2026
4 min read
Master image with text overlay in React Native with responsive, accessible patterns. Learn expo setup, NativeWind styling, and gluestack-ui examples.

Feb 03, 2026
4 min read
Discover cross platform app development with proven strategies to build faster for iOS, Android, and the web using a single, unified codebase.

Feb 01, 2026
4 min read
Learn how to make an app for my business quickly with template-based steps from planning to launch, plus tips to scale and optimize.

Jan 31, 2026
4 min read
Ready to build an app? This guide shares practical strategies for validating your idea, choosing a tech stack, and navigating the App Store launch.

Jan 30, 2026
4 min read
Master responsive design for mobile apps with this guide on fluid layouts, breakpoints, and React Native. Build UIs that adapt perfectly to any screen.

Jan 25, 2026
4 min read
Learn how to design an Android app that stands out. This guide covers UX research, wireframing, Material Design, and the developer handoff process.

Jan 24, 2026
4 min read
Explore ui design web essentials: a complete guide to principles, responsive patterns, and workflows for intuitive, engaging web interfaces.

Jan 23, 2026
4 min read
Discover 10 essential mobile app design best practices for building exceptional cross-platform apps. Actionable tips for UI, UX, navigation, and performance.

Jan 21, 2026
4 min read
Discover how to debug React Native apps effectively. This guide covers Flipper, React DevTools, and native code troubleshooting for faster development cycles.

Jan 20, 2026
4 min read
Learn how to create app for your business with a practical, modern approach. Plan, customize, and launch with proven steps.

Jan 19, 2026
4 min read
A complete guide to mobile app development for startups. Learn how to validate your idea, build an MVP, and launch a successful app faster and more affordably.

Jan 18, 2026
4 min read
Discover how to choose the right React website template to accelerate your project. Our guide covers everything from quality checklists to deployment.

Jan 17, 2026
4 min read
Discover how to choose, customize, and deploy a React Native app template. This guide provides practical steps for launching production-ready apps faster.

Jan 16, 2026
4 min read
Discover how mobile application templates accelerate development. This guide covers how to choose, customize, and launch your app with the right foundation.

Jan 13, 2026
4 min read
Start your journey in mobile app development for beginners. This guide breaks down how to build your first cross-platform app with React Native and Expo.

Jan 12, 2026
4 min read
Explore the best react native ui libraries and compare features, performance, and ease of use to pick the right toolkit for your app.

Jan 10, 2026
4 min read
Master modern cash app design with this guide. Learn the UI/UX, security, and React Native strategies needed to build a fintech app that users trust and love.

Jan 09, 2026
4 min read
Learn how to build a personal finance dashboard with React Native. A practical guide for developers on UI design, data architecture, and production readiness.

Jan 08, 2026
4 min read
A practical guide to building a cross-platform event check in app with React Native. Learn to implement QR scanning, offline sync, and deployment.

Jan 07, 2026
4 min read
Master linear gradient React Native components with our complete guide. Learn practical techniques for Expo, bare RN, and NativeWind to build stunning UIs.

Jan 06, 2026
4 min read
Learn how to change application name in your React Native & Expo projects. This guide covers display names, package IDs, and app store listings.

Jan 05, 2026
4 min read
Discover how to monetize mobile apps with our founder's guide. Learn proven React Native strategies for ads, IAPs, and subscriptions to maximize your revenue.

Jan 04, 2026
4 min read
A practical guide on how to create a website app with a single codebase. Learn to build for web, iOS, and Android using React Native, Expo, and TypeScript.

Jan 03, 2026
4 min read
Learn how to create an app for your business with this definitive guide. Discover practical strategies for validation, development, and launch that work.

Jan 02, 2026
4 min read
Learn how to create a wireframe for a website with this practical guide. Move from initial sketches to developer-ready designs that get built right.

Jan 01, 2026
4 min read
Deciding on progressive web application vs native? This guide offers a deep comparison of performance, cost, UX, and use cases to help you choose wisely.

Dec 31, 2025
4 min read
Discover 10 mobile app security best practices for React Native. Learn to secure data, APIs, and code with actionable tips and examples for 2025.

Dec 30, 2025
4 min read
Unlock the real React Native app development cost. Our guide breaks down pricing by feature, team, and complexity to help you budget with confidence.

Dec 29, 2025
4 min read
A practical guide to master your React Native debug workflow. Learn to use Flipper, React DevTools, and Hermes to solve bugs in Expo and bare RN apps.

Dec 28, 2025
4 min read
The ultimate React Native tutorial for beginners. Learn to build beautiful cross-platform apps using a modern stack like Expo, TypeScript, and gluestack-ui.

Dec 27, 2025
4 min read
A practical guide on how to build a mobile app. Learn to go from concept to a market-ready app using templates, React Native, and proven development strategies.

Dec 26, 2025
4 min read
Discover interface design for websites with actionable tips on layout, responsiveness, and usability to boost conversions.

Dec 25, 2025
4 min read
Discover designs for apps that blend minimal aesthetics with personalization, and learn to build user-centric interfaces that boost engagement.

Dec 24, 2025
4 min read
Learn graphical interface design - essentials for mastering core principles, modern workflows, and cross-platform strategies to build intuitive, engaging UIs.

Dec 23, 2025
4 min read
Discover how high fi wireframes bridge the gap between ideas and code. Learn a practical workflow for creating, testing, and handing off effective UI designs.

Dec 22, 2025
4 min read
Discover mobile app interface design with practical principles, accessibility, and workflows that boost user engagement.

Dec 21, 2025
4 min read
Explore the top 10 UI UX design trends for 2025. Get expert insights and practical React Native tips to build next-gen cross-platform apps that stand out.

Dec 20, 2025
4 min read
Discover how mobile app templates accelerate development from idea to launch. Learn to select, customize, and deploy templates for a faster time to market.

Dec 18, 2025
4 min read
Explore the best react native ui libraries to accelerate mobile development with performance, theming, and accessibility. Expert tips inside.

Dec 16, 2025
4 min read
Master React Native PDF handling. Learn to generate, view, and share PDFs with practical code examples, library comparisons, and performance tips.

Dec 15, 2025
4 min read
A practical guide to choosing the right React Native component library. Learn how to evaluate options, avoid common pitfalls, and build apps faster.

Dec 14, 2025
4 min read
Find the perfect React Native UI library for your project. This guide compares top libraries, selection criteria, and customization strategies.

Dec 13, 2025
4 min read
Learn how to change app name in React Native and Expo. Our guide covers display names, bundle IDs, and store listings for iOS and Android projects.

Dec 12, 2025
4 min read
Discover the best React Native component library for your next project. We compare top libraries on performance, customization, and real-world use cases.

Dec 11, 2025
4 min read
Discover how to choose the right React Native UI kit. This guide covers top kits, selection criteria, and customization to accelerate your app development.

Dec 10, 2025
4 min read
Explore our in-depth guide to find the best React Native UI library. We compare top contenders to help you choose the right fit for your project.

Dec 09, 2025
4 min read
Discover a practical approach to building apps with React Native. This guide covers setup, UI, state management, and testing to help you ship great apps.

Dec 08, 2025
4 min read
android login with facebook: Learn to set up the Facebook SDK, manage tokens, and implement secure authentication across native Android, cross-platform apps.

Dec 07, 2025
4 min read
Master the alert in React Native. Learn to handle platform differences, build custom modals, and apply best practices for a seamless user experience.

Dec 06, 2025
4 min read
keyboardavoidingview react native: Master keyboard handling with KeyboardAvoidingView across iOS, Android, Expo, and TypeScript.

Dec 05, 2025
4 min read
A practical guide to implementing a React Native PDF viewer. Learn to compare libraries, handle native setup, and troubleshoot common issues with real code.

Dec 04, 2025
4 min read
how to validate startup idea: learn proven methods like customer interviews, MVPs, and metrics to confirm market fit.

Dec 03, 2025
4 min read
how to make app like uber: Learn core features, tech stack, development steps, testing, and launch tips.

Dec 02, 2025
4 min read
Build a rock-solid React Native setup. This guide covers Expo vs. Bare workflows, TypeScript, pnpm monorepos, NativeWind, and deployment strategies.

Dec 01, 2025
4 min read
A practical guide to Stripe React Native integration. Learn to set up your server, build payment UIs, handle webhooks, and launch secure mobile payments.

Nov 30, 2025
4 min read
Learn how to master push notifications in React Native. This guide covers setup, best practices, and advanced techniques for engaging your users.

Nov 29, 2025
4 min read
Build powerful location-based apps with our practical guide to react native with google maps. Get setup guides, pro tips, and best practices for iOS & Android.

Nov 28, 2025
4 min read
Explore deep linking react native with a practical guide to configuring URL schemes, universal links, navigation, and testing for Expo and bare apps.

Nov 28, 2025
4 min read
A practical guide to building a scalable React Native design system. Learn to implement tokens, theming, and tools like NativeWind and gluestack-ui.

Nov 26, 2025
4 min read
Learn why react native expo templates speed up your projects with ready-made patterns and practical tips.

Nov 25, 2025
4 min read
Discover how to improve developer productivity with actionable strategies for workflow, tooling, and culture. A practical guide for software engineering teams.

Nov 24, 2025
4 min read
Discover the best cross platform app development tools. Compare top frameworks like Flutter and React Native to build and ship apps faster.

Nov 23, 2025
4 min read
This Expo React Native tutorial provides a hands-on guide to building cross-platform apps. Learn setup, styling with NativeWind, navigation, and deployment.

Nov 22, 2025
4 min read
Build beautiful UIs faster with this guide to Tailwind CSS React Native. Learn setup, styling, and advanced techniques with NativeWind for mobile apps.

Nov 21, 2025
4 min read
Explore our curated list of 7 top-tier React Native app examples. Discover production-ready templates and resources to build your next app faster.

Mar 19, 2025
4 min read
gluestack market offers React Native UI templates to accelerate development. Get customizable, production-ready React Native app templates and Ui kit, some free. Build faster & smarter today!