Before you write a single line of code, you need a rock-solid plan. This isn't just about brainstorming features; it's a strategic process of researching your market, zeroing in on a real problem to solve, and mapping out a user-friendly experience. This blueprint is what turns a cool idea into a validated concept with actual market potential.
Diving straight into development without a clear strategy is one of the fastest ways to fail. I've seen it happen too many times. A well-thought-out plan becomes your north star, guiding every technical decision and making sure you’re building something people will actually use and, hopefully, pay for.
Think of it this way: you wouldn't build a house without architectural blueprints. The same exact principle applies when you build an app. Skipping this foundational work almost always leads to wasted time, blown budgets, and a final product that just doesn't connect with its intended audience.
First things first, you have to get laser-focused on the exact problem your app solves. What specific pain point are you easing for your users? A vague idea like "a social app for friends" is going nowhere. It’s too broad.
On the other hand, a concept like "an app that helps college students find on-campus study groups for specific classes" has a clear purpose and a defined user.
Once you’ve nailed down the problem, you need to know exactly who you're solving it for. Get granular and build out a detailed user persona.
Knowing your audience inside and out is the secret to making sure every feature you build is genuinely valuable to them.
Okay, you have a clear idea and a target audience. Now it's time to see who else is out there. Your app doesn't exist in a vacuum. You need to look at existing apps solving similar problems and break down what they do well and, more importantly, where they fall short. This analysis is how you find your unique opening in the market.
A common mistake I see founders make is assuming competition is a bad sign. It's actually the opposite. Competitors often prove that a market for your idea already exists. The real challenge is figuring out how to differentiate your solution.
Your goal isn't just to clone features. It's to offer a unique value proposition. Maybe your app is dramatically easier to use, has a killer niche feature competitors have overlooked, or targets a specific underserved corner of the market. This process is absolutely critical for sharpening your idea and figuring out what will make your app stand out. If you want to go deeper on this, you can learn more about how to validate a startup idea before sinking major resources into it.
This workflow is a simple but powerful way to visualize the pre-development stages.
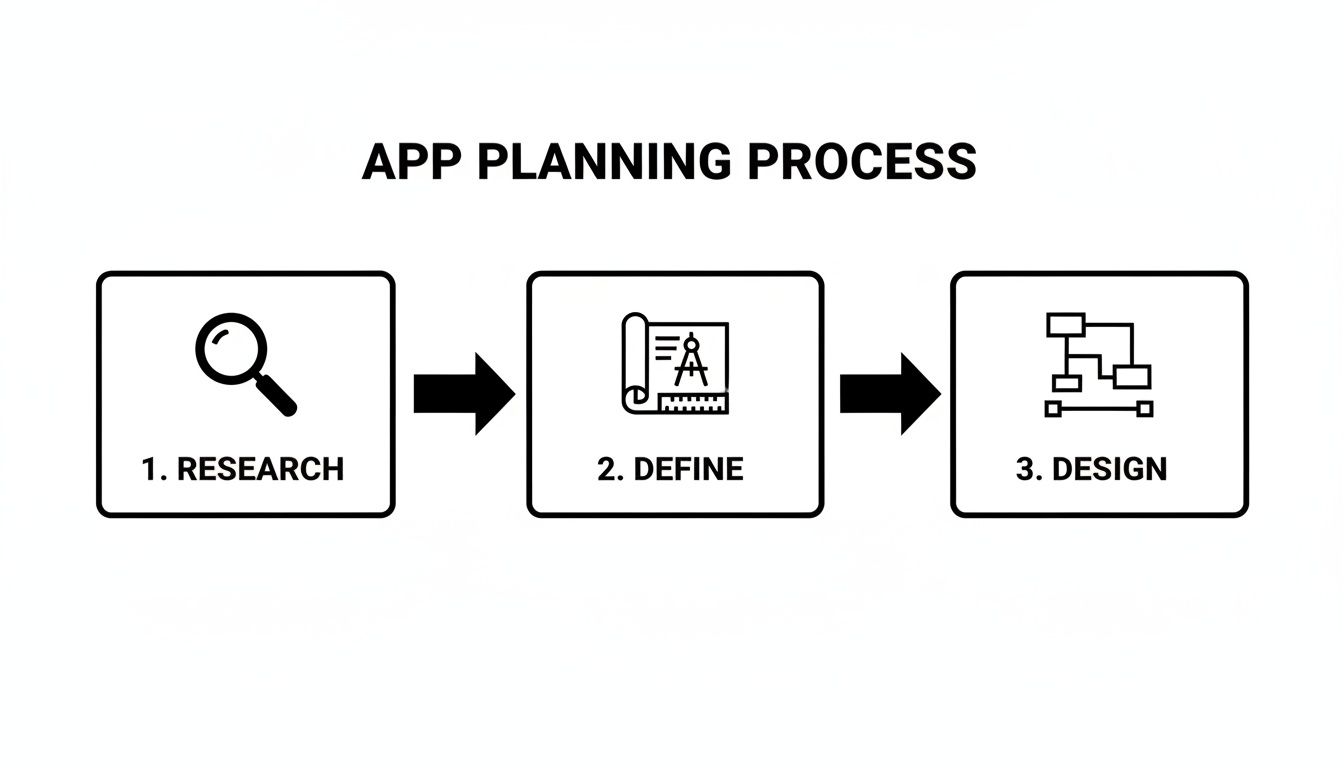
Following this flow from research to design ensures each step logically informs the next, building a user-centered foundation before development even begins.
You can't build every feature at once—and you shouldn't try. The next critical step is defining the absolute core functionality for your Minimum Viable Product (MVP). Your MVP is the leanest, most stripped-down version of your app that still solves the primary problem for your target user.
Make a master list of every feature you can dream up, then get ruthless with prioritization. A simple way to do this is to sort them into "must-have," "should-have," and "nice-to-have" buckets. Your MVP will only include the "must-haves."
This approach gets you to launch faster, lets you collect feedback from real users, and allows you to iterate based on hard data instead of just your own assumptions. By focusing on a lean initial release, you slash development costs and get your product into the market months earlier than you would otherwise.
Alright, once you've got your app's blueprint sketched out, it's time for the next big decision: picking the tools you'll actually use to build the thing. This isn't a small choice—it shapes your development speed, your budget, and how painful (or easy) maintenance will be down the road.
Building an app today means thinking cross-platform from the jump. It's not just a nice-to-have anymore; it’s how you reach the biggest audience without doubling your work.
That’s why we’re all-in on a specific stack: React Native, Expo, TypeScript, NativeWind, and gluestack-ui. It’s a modern, powerful setup designed to get you from a single codebase to a beautiful app running on iOS, Android, and the web.

The heart of our stack is React Native. It’s a game-changer because it lets you write your app in JavaScript and TypeScript, which then renders as truly native components on each device. No more separate teams and codebases for iOS and Android. This "write once, run anywhere" philosophy isn't just a catchy phrase; it can genuinely slash your development time and costs by nearly 50%.
Then there's Expo, which sits on top of React Native and smooths out all the rough edges. It takes care of the gnarly parts of native builds, over-the-air updates, and accessing device hardware like the camera or GPS. You get to spend less time fighting with Xcode or Android Studio and more time actually building features.
As your app gets more complex, you need to make sure your code is solid. That's where TypeScript comes in. By adding static types to JavaScript, it catches a ton of common bugs while you're coding, not after you've shipped to users. It just makes for more predictable code, especially when you're working with a team.
For styling, we lean on NativeWind. It brings the magic of Tailwind CSS to the React Native world. You style components directly in your code with utility classes instead of wrestling with separate stylesheets. It’s incredibly fast for building UIs and helps keep your design system tight and consistent.
The last piece of the puzzle is your UI library. Honestly, building every single button, form, and modal from scratch is a massive time sink. This is where you can get a huge head start.
Leveraging pre-built components from tools like these can save you hundreds of hours of foundational UI work. You get to focus on what makes your app special, not on the basics. For a deeper dive, check out our guide on the top cross-platform app development tools you can use today.
Deciding to go with this stack is about making a conscious choice for speed, quality, and efficiency. It gives small teams and even solo founders the power to build a truly professional app that can hang with the big players.
When you're starting out, the "build vs. buy" decision is crucial. Here’s a quick breakdown of building your UI from the ground up versus using a template marketplace to get a running start.
| Factor | Building From Scratch | Using gluestack market / AppLaunchKit |
|---|---|---|
| Time to Market | Months. You're building every button, screen, and interaction. | Weeks or even days. Leverage pre-built, tested components and screens. |
| Upfront Cost | High. Requires significant developer hours for design and implementation. | Low. A one-time purchase is a fraction of the cost of custom development. |
| Customization | Total control. You can build anything, but you have to build everything. | High flexibility. Templates are designed for easy customization of themes, fonts, and colors. |
| Maintenance | Your responsibility. Every component you build is another you have to maintain. | Shared effort. You get regular updates and dedicated support for the core template. |
| Focus | UI/UX fundamentals. A lot of time is spent on foundational elements. | Core app logic. You can immediately start building your app's unique features. |
Ultimately, using a template from gluestack market or a kit like AppLaunchKit is about trading a bit of bespoke control for a massive gain in speed and efficiency, which is often the smartest move for getting a new product to market.
Once your tech stack is locked in, you hit a major fork in the road. Do you build every single button, form, and layout from scratch? Or do you get a massive head start by using a pre-built foundation?
Honestly, for most of us trying to get an app to market without burning through our budget, the answer is pretty clear.
Starting from a blank canvas sounds great in theory, but it's often a direct path to blown deadlines and budget overruns. The hard truth is that a huge chunk of UI development is just repetitive. You’re building login screens, settings pages, and user profiles—the same stuff that's been built thousands of times before. Reinventing the wheel here is a terrible use of your two most precious resources: time and money.

This is where platforms like gluestack market completely change the game. By offering production-ready, accessible, and well-documented templates, they let you skip the tedious grunt work. You can jump straight into building the features that actually make your app unique. This one decision can easily shave weeks, or even months, off your development timeline.
Choosing the right template is your first move in this accelerated process. Your choice really boils down to the scope and nature of your project. The goal is to find a starting point that aligns closely with your app's core purpose, which will cut down on the amount of customization you'll have to do later.
You've got a couple of solid options to consider:
For example, if you're building a guided journaling app, starting with a meditation template from gluestack market gives you a huge thematic and functional advantage. The core navigation, content display, and serene aesthetic are already there, letting you focus entirely on the journaling logic itself.
Once you've picked a template, the real fun begins: making it yours. A good template isn't a rigid box; it's a flexible base designed to be customized. The whole point is to infuse your brand identity and unique features into that pre-built structure.
The customization process usually hits a few key areas. First up is branding. This means swapping out the default color palette, typography, and logo to match your visual identity. Templates built with tools like NativeWind make this incredibly simple—often, you just need to tweak a single configuration file to see changes ripple across the entire app.
Next, you'll want to adapt the component structure. This could be as simple as rearranging elements on a screen or as complex as integrating entirely new, custom-built components. Maybe your finance app needs a custom-designed charting component that wasn't in the original template. Since you have the full source code, you can easily slot that new piece right into the existing layout.
The true power of a template isn't just what it gives you out of the box, but how easily it lets you add what's missing. It handles the 80% of common UI work, freeing you to focus on the 20% that delivers your unique value.
It's impossible to ignore the impact of AI on the app world. AI chatbot apps, for instance, have seen a staggering 112% year-over-year growth—the biggest jump of any app category. At the same time, global app marketing spend has hit USD 109 billion, showing just how much cash it takes to launch and scale successfully. When you combine those trends, using pre-built templates becomes a strategic move. It lets you focus your limited resources on what truly sets you apart, not on reinventing foundational code. For more data on this, check out this detailed report on mobile app trends.
Ultimately, when you choose a high-quality template, you’re not just buying code; you’re buying time and a quality head start. You get your MVP out the door faster, with a more polished and reliable UI, giving you a critical advantage in a very crowded market.
Alright, you’ve got your template as a launchpad. Now for the fun part: bringing your app to life with the features that make it yours. This is where you go beyond the boilerplate and start coding the soul of your application.
First things first, you need to manage what’s going on inside your app. This is often called application state. Think of it as your app's short-term memory—it knows if a user is logged in, what's in their shopping cart, or which theme is active. For a React Native app, libraries like Zustand or Redux Toolkit are my go-to tools for wrangling this data flow and keeping things predictable.

Let's say you're building a fitness tracker. Your state management system is what holds onto the user's daily step count, their workout history, and personal goals. As the user walks around, the state updates, and your UI instantly reflects the new step count. Nailing your state management strategy isn't just a "nice-to-have"; it's non-negotiable for a slick, responsive user experience.
These days, very few apps live on an island. They need to talk to the outside world to be truly useful, and that happens through API integrations. Whether you're pulling in stock prices, processing a credit card payment with Stripe, or fetching content from your own backend, connecting to APIs is a core skill.
Using a library like axios or the native fetch API in your React Native project makes this pretty straightforward. You'll be sending requests to different endpoints, parsing the data that comes back, and—just as importantly—gracefully handling errors when something goes wrong, like a spotty network connection.
One of the most critical integrations for almost any app is user authentication. You need a secure, reliable way for users to sign up, log in, and manage their profiles. This is where services like Firebase Authentication or Supabase Auth become your best friends. They provide rock-solid, out-of-the-box solutions for everything from email/password logins to social sign-ins with Google or Apple.
From my experience, trying to roll your own authentication system is a classic mistake that delays projects and introduces massive security risks. Leveraging a trusted third-party service lets you focus on your core app features while ensuring your user data is protected by industry-standard security.
Shipping features is only half the story. To build an app people will actually trust and enjoy using, it has to be reliable and bug-free. That’s where a multi-layered testing strategy comes into play, starting from the smallest bits of code and working all the way up to the full user experience.
Unit Testing: This is your first line of defense. You're testing individual functions or components in total isolation. With a tool like Jest and React Native Testing Library, you can write a simple test to confirm a button component fires an onPress event or that a utility function calculates a price correctly.
Integration Testing: Next, you zoom out a bit to see how different parts work together. For instance, does filling out a form and hitting "submit" actually update the data in your state management store as expected? This is where you catch the mismatches between components.
End-to-End (E2E) Testing: This is the big one. Here, you automate a complete user journey from start to finish. Tools like Maestro or Detox can literally script a robot to open the app, log in, navigate to a specific screen, and perform an action, all on a real device or simulator. This is how you find those pesky bugs that only pop up when everything is running together.
Manually running all these tests and building your app for the App Store every time you make a change is a recipe for disaster. It's slow, tedious, and incredibly easy to forget a step. The professional solution is Continuous Integration and Continuous Deployment (CI/CD).
By setting up a CI/CD pipeline with a service like GitHub Actions or Expo Application Services (EAS), you can automate the entire quality assurance process.
Every single time a developer pushes new code, the pipeline can automatically kick off a series of jobs:
If even a single test fails, the build halts, and the team gets an immediate notification. This automated safety net is a game-changer. It ensures bad code never even gets close to your users, leading to a far more stable and professional application. Even if you're a solo dev, setting this up will drastically improve your workflow and the quality of your final product.
You’ve poured everything into building the features, you’ve meticulously tested your code, and you’ve finally squashed that last annoying bug. Now for the final boss battle: getting your app into the hands of real users. The deployment process for app stores can feel like a labyrinth of rules and weird requirements, but if you treat it like a checklist, it's a path you can absolutely conquer.
This is the moment of truth, where your project graduates from a local folder on your machine to a live product on the world stage. Each platform—the Apple App Store, the Google Play Store, and the open web—plays by its own rules. The secret to a smooth submission and a quick approval is to get all your assets and metadata lined up perfectly from the start.
Before you even dream of hitting that “submit” button, you need to gather all the marketing and technical pieces that will represent your app on the storefront. This is your one and only chance to make a first impression, so don't cut corners here. A polished presentation can be the difference between a user scrolling past or hitting "download."
Here’s what your pre-submission checklist should look like:
Think of this prep work as more than just admin tasks. It's a foundational piece of your marketing strategy and key to making sure the right people find your app.
Every major app store has its own rulebook, and learning the basics can save you from the frustrating delays that come with common rejections. At the end of the day, the review process is there to make sure apps are safe, they work, and they offer a good experience.
The Apple App Store is famous for its tough review guidelines. They are sticklers for user privacy, clean UI/UX that follows their Human Interface Guidelines, and overall app quality. A super common reason for rejection is having incomplete information or an app that just feels half-baked.
My biggest tip for passing the Apple review is to be incredibly thorough. Fill out every single field in App Store Connect, write detailed notes for the reviewer (especially if your app requires a login), and double-check that every feature works as advertised. A little extra effort upfront can prevent weeks of back-and-forth.
The Google Play Store usually has a faster, more automated review process, but they're still incredibly strict about malware, shady content, and intellectual property theft. Make sure every permission your app requests is clearly justified and that you have a privacy policy linked directly from your store listing.
The global mobile app market is absolutely exploding, with projections showing growth from USD 330.61 billion to over USD 1.2 trillion by 2035. This points to a massive opportunity for developers who can get their apps launched efficiently. You can dig into more insights on the mobile application market's trajectory and see why speed-to-market is such a game-changer.
If you have a web version of your app built with React Native for Web, deployment is a breath of fresh air. There's no formal review process to navigate. You just need a place to host your static files, and you're good to go.
Services like Vercel and Netlify are my go-to recommendations for this. They plug right into your code repository (like GitHub) and can automatically build and deploy your site every single time you push a new change. This creates a beautifully seamless CI/CD workflow, letting you ship updates to your web app in minutes. It's a completely hands-off approach that guarantees your web users are always running the latest and greatest version.
Getting your app approved and listed on the stores feels like you've crossed the finish line, but let's be real—it's just the starting gun. The race to build an app that actually succeeds begins now. Your focus has to pivot from pure development to growth, turning those first few downloads into a thriving, engaged user base.
This new phase is all about data. Without it, you're just guessing. Integrating an analytics platform is non-negotiable; tools like Google Analytics for Firebase or Amplitude are your new best friends. They give you a direct window into how people really use your app.
Once your analytics are wired up, you can stop assuming and start knowing. The goal is to track the key performance indicators (KPIs) that paint a clear picture of your app's health. Don't get distracted by vanity metrics like total downloads—they don't pay the bills. Focus on what truly matters.
Here’s what I always keep a close eye on:
A critical metric for long-term health is your app user retention rate. Keeping users is way cheaper and more effective than constantly chasing new ones. This needs your continuous attention right from day one.
With a steady stream of data telling you what your users are doing, you can finally make an informed decision on how to generate revenue. The right monetization strategy has to feel natural for your app and your audience. If you try to force a model that doesn't fit, you'll just push people away.
In-app purchase revenue is the engine of the mobile world, hitting an incredible USD 1.67 trillion globally with a 10.6% year-over-year jump. The Apple App Store still dominates, holding over 63% of the market share. For developers using platforms like gluestack market, these numbers aren't just stats; they're a clear sign of the massive potential when you have a solid monetization plan from the get-go.
Here are a few of the most popular models I've seen work:
Choosing a monetization strategy isn't a "set it and forget it" decision. Be ready to test, listen to feedback, and iterate based on your analytics. What works for one app might completely fail for another.
For a deeper dive into these strategies, check out our guide on how to monetize mobile apps.
A successful app is never "done." The market is always changing, and your app needs to evolve right along with it. This means ongoing maintenance is crucial for keeping users happy and your app feeling fresh.
You'll need to promptly fix bugs, optimize performance for the latest OS updates and devices, and regularly ship meaningful updates.
Use push notifications and in-app messages to bring back users who have gone quiet. Announce a cool new feature, offer a special discount, or just send a helpful reminder about the value your app provides. By listening to your users and continuously improving their experience, you turn a simple launch into a foundation for lasting success.

Feb 23, 2026

4 min read
Discover powerful mobile app monetization strategies to boost your revenue. Our guide covers IAPs, ads, and subscriptions for React Native apps and beyond.

Feb 22, 2026
4 min read
A clear guide to app development cost estimation. Learn what drives costs, see budget examples, and discover strategies to build your app for less.

Feb 21, 2026
4 min read
Discover how to promote mobile application effectively with proven ASO, paid campaigns, and retention strategies.

Feb 15, 2026
4 min read
Discover how to create a prototype of a website with a practical, step-by-step guide. Explore tools, testing methods, and tips to bring your idea to life.

Feb 14, 2026
4 min read
Confused about mockups vs wireframes? Learn the key differences, when to use each, and how to streamline your React Native app development workflow.

Feb 13, 2026
4 min read
Discover how mobile apps templates accelerate development. Learn to choose, customize, and deploy high-quality React Native templates for your next project.

Feb 12, 2026
4 min read
Explore mobile application interface design with practical tips, core principles, and platform-aware workflows to craft apps users love.

Feb 10, 2026
4 min read
Learn mobile first design principles to craft fast, accessible apps that delight users. Practical tips, examples, and testing strategies.

Feb 08, 2026
4 min read
Explore the progressive web app vs native debate with our in-depth guide. We compare performance, cost, and UX to help you make the right strategic choice.

Feb 07, 2026
4 min read
Discover how React Native templates can accelerate your app development. This guide explores choosing, customizing, and deploying templates for faster launches.

Feb 05, 2026
4 min read
Discover the key differences between expo vs react native, including workflow, builds, and performance to help you pick the right path for your app.

Feb 03, 2026
4 min read
Master image with text overlay in React Native with responsive, accessible patterns. Learn expo setup, NativeWind styling, and gluestack-ui examples.

Feb 03, 2026
4 min read
Discover cross platform app development with proven strategies to build faster for iOS, Android, and the web using a single, unified codebase.

Feb 01, 2026
4 min read
Learn how to make an app for my business quickly with template-based steps from planning to launch, plus tips to scale and optimize.

Jan 30, 2026
4 min read
Master responsive design for mobile apps with this guide on fluid layouts, breakpoints, and React Native. Build UIs that adapt perfectly to any screen.

Jan 25, 2026
4 min read
Learn how to design an Android app that stands out. This guide covers UX research, wireframing, Material Design, and the developer handoff process.

Jan 24, 2026
4 min read
Explore ui design web essentials: a complete guide to principles, responsive patterns, and workflows for intuitive, engaging web interfaces.

Jan 23, 2026
4 min read
Discover 10 essential mobile app design best practices for building exceptional cross-platform apps. Actionable tips for UI, UX, navigation, and performance.

Jan 21, 2026
4 min read
Discover how to debug React Native apps effectively. This guide covers Flipper, React DevTools, and native code troubleshooting for faster development cycles.

Jan 20, 2026
4 min read
Learn how to create app for your business with a practical, modern approach. Plan, customize, and launch with proven steps.

Jan 19, 2026
4 min read
A complete guide to mobile app development for startups. Learn how to validate your idea, build an MVP, and launch a successful app faster and more affordably.

Jan 18, 2026
4 min read
Discover how to choose the right React website template to accelerate your project. Our guide covers everything from quality checklists to deployment.

Jan 17, 2026
4 min read
Discover how to choose, customize, and deploy a React Native app template. This guide provides practical steps for launching production-ready apps faster.

Jan 16, 2026
4 min read
Discover how mobile application templates accelerate development. This guide covers how to choose, customize, and launch your app with the right foundation.

Jan 13, 2026
4 min read
Start your journey in mobile app development for beginners. This guide breaks down how to build your first cross-platform app with React Native and Expo.

Jan 12, 2026
4 min read
Explore the best react native ui libraries and compare features, performance, and ease of use to pick the right toolkit for your app.

Jan 11, 2026
4 min read
Launch your own ride-hailing service with our guide to building a production-ready Uber app clone. Learn MVP strategy, tech stacks, and backend integration.

Jan 10, 2026
4 min read
Master modern cash app design with this guide. Learn the UI/UX, security, and React Native strategies needed to build a fintech app that users trust and love.

Jan 09, 2026
4 min read
Learn how to build a personal finance dashboard with React Native. A practical guide for developers on UI design, data architecture, and production readiness.

Jan 08, 2026
4 min read
A practical guide to building a cross-platform event check in app with React Native. Learn to implement QR scanning, offline sync, and deployment.

Jan 07, 2026
4 min read
Master linear gradient React Native components with our complete guide. Learn practical techniques for Expo, bare RN, and NativeWind to build stunning UIs.

Jan 06, 2026
4 min read
Learn how to change application name in your React Native & Expo projects. This guide covers display names, package IDs, and app store listings.

Jan 05, 2026
4 min read
Discover how to monetize mobile apps with our founder's guide. Learn proven React Native strategies for ads, IAPs, and subscriptions to maximize your revenue.

Jan 04, 2026
4 min read
A practical guide on how to create a website app with a single codebase. Learn to build for web, iOS, and Android using React Native, Expo, and TypeScript.

Jan 03, 2026
4 min read
Learn how to create an app for your business with this definitive guide. Discover practical strategies for validation, development, and launch that work.

Jan 02, 2026
4 min read
Learn how to create a wireframe for a website with this practical guide. Move from initial sketches to developer-ready designs that get built right.

Jan 01, 2026
4 min read
Deciding on progressive web application vs native? This guide offers a deep comparison of performance, cost, UX, and use cases to help you choose wisely.

Dec 31, 2025
4 min read
Discover 10 mobile app security best practices for React Native. Learn to secure data, APIs, and code with actionable tips and examples for 2025.

Dec 30, 2025
4 min read
Unlock the real React Native app development cost. Our guide breaks down pricing by feature, team, and complexity to help you budget with confidence.

Dec 29, 2025
4 min read
A practical guide to master your React Native debug workflow. Learn to use Flipper, React DevTools, and Hermes to solve bugs in Expo and bare RN apps.

Dec 28, 2025
4 min read
The ultimate React Native tutorial for beginners. Learn to build beautiful cross-platform apps using a modern stack like Expo, TypeScript, and gluestack-ui.

Dec 27, 2025
4 min read
A practical guide on how to build a mobile app. Learn to go from concept to a market-ready app using templates, React Native, and proven development strategies.

Dec 26, 2025
4 min read
Discover interface design for websites with actionable tips on layout, responsiveness, and usability to boost conversions.

Dec 25, 2025
4 min read
Discover designs for apps that blend minimal aesthetics with personalization, and learn to build user-centric interfaces that boost engagement.

Dec 24, 2025
4 min read
Learn graphical interface design - essentials for mastering core principles, modern workflows, and cross-platform strategies to build intuitive, engaging UIs.

Dec 23, 2025
4 min read
Discover how high fi wireframes bridge the gap between ideas and code. Learn a practical workflow for creating, testing, and handing off effective UI designs.

Dec 22, 2025
4 min read
Discover mobile app interface design with practical principles, accessibility, and workflows that boost user engagement.

Dec 21, 2025
4 min read
Explore the top 10 UI UX design trends for 2025. Get expert insights and practical React Native tips to build next-gen cross-platform apps that stand out.

Dec 20, 2025
4 min read
Discover how mobile app templates accelerate development from idea to launch. Learn to select, customize, and deploy templates for a faster time to market.

Dec 18, 2025
4 min read
Explore the best react native ui libraries to accelerate mobile development with performance, theming, and accessibility. Expert tips inside.

Dec 16, 2025
4 min read
Master React Native PDF handling. Learn to generate, view, and share PDFs with practical code examples, library comparisons, and performance tips.

Dec 15, 2025
4 min read
A practical guide to choosing the right React Native component library. Learn how to evaluate options, avoid common pitfalls, and build apps faster.

Dec 14, 2025
4 min read
Find the perfect React Native UI library for your project. This guide compares top libraries, selection criteria, and customization strategies.

Dec 13, 2025
4 min read
Learn how to change app name in React Native and Expo. Our guide covers display names, bundle IDs, and store listings for iOS and Android projects.

Dec 12, 2025
4 min read
Discover the best React Native component library for your next project. We compare top libraries on performance, customization, and real-world use cases.

Dec 11, 2025
4 min read
Discover how to choose the right React Native UI kit. This guide covers top kits, selection criteria, and customization to accelerate your app development.

Dec 10, 2025
4 min read
Explore our in-depth guide to find the best React Native UI library. We compare top contenders to help you choose the right fit for your project.

Dec 09, 2025
4 min read
Discover a practical approach to building apps with React Native. This guide covers setup, UI, state management, and testing to help you ship great apps.

Dec 08, 2025
4 min read
android login with facebook: Learn to set up the Facebook SDK, manage tokens, and implement secure authentication across native Android, cross-platform apps.

Dec 07, 2025
4 min read
Master the alert in React Native. Learn to handle platform differences, build custom modals, and apply best practices for a seamless user experience.

Dec 06, 2025
4 min read
keyboardavoidingview react native: Master keyboard handling with KeyboardAvoidingView across iOS, Android, Expo, and TypeScript.

Dec 05, 2025
4 min read
A practical guide to implementing a React Native PDF viewer. Learn to compare libraries, handle native setup, and troubleshoot common issues with real code.

Dec 04, 2025
4 min read
how to validate startup idea: learn proven methods like customer interviews, MVPs, and metrics to confirm market fit.

Dec 03, 2025
4 min read
how to make app like uber: Learn core features, tech stack, development steps, testing, and launch tips.

Dec 02, 2025
4 min read
Build a rock-solid React Native setup. This guide covers Expo vs. Bare workflows, TypeScript, pnpm monorepos, NativeWind, and deployment strategies.

Dec 01, 2025
4 min read
A practical guide to Stripe React Native integration. Learn to set up your server, build payment UIs, handle webhooks, and launch secure mobile payments.

Nov 30, 2025
4 min read
Learn how to master push notifications in React Native. This guide covers setup, best practices, and advanced techniques for engaging your users.

Nov 29, 2025
4 min read
Build powerful location-based apps with our practical guide to react native with google maps. Get setup guides, pro tips, and best practices for iOS & Android.

Nov 28, 2025
4 min read
Explore deep linking react native with a practical guide to configuring URL schemes, universal links, navigation, and testing for Expo and bare apps.

Nov 28, 2025
4 min read
A practical guide to building a scalable React Native design system. Learn to implement tokens, theming, and tools like NativeWind and gluestack-ui.

Nov 26, 2025
4 min read
Learn why react native expo templates speed up your projects with ready-made patterns and practical tips.

Nov 25, 2025
4 min read
Discover how to improve developer productivity with actionable strategies for workflow, tooling, and culture. A practical guide for software engineering teams.

Nov 24, 2025
4 min read
Discover the best cross platform app development tools. Compare top frameworks like Flutter and React Native to build and ship apps faster.

Nov 23, 2025
4 min read
This Expo React Native tutorial provides a hands-on guide to building cross-platform apps. Learn setup, styling with NativeWind, navigation, and deployment.

Nov 22, 2025
4 min read
Build beautiful UIs faster with this guide to Tailwind CSS React Native. Learn setup, styling, and advanced techniques with NativeWind for mobile apps.

Nov 21, 2025
4 min read
Explore our curated list of 7 top-tier React Native app examples. Discover production-ready templates and resources to build your next app faster.

Mar 19, 2025
4 min read
gluestack market offers React Native UI templates to accelerate development. Get customizable, production-ready React Native app templates and Ui kit, some free. Build faster & smarter today!
