Feb 01, 2026

4 min read

So you want to build an app for your business. The idea of launching a mobile app can feel huge, like a mountain you have to climb. But it doesn't have to be.
Forget the old way of thinking—the six-figure budgets and year-long timelines. There's a much smarter path, one that gets your app into the hands of customers quickly without breaking the bank. The secret? Starting with a production-ready React Native template.
This guide is for business owners and startups who need to move fast. We'll walk through a modern, practical approach that sits right in the sweet spot between hiring a super-expensive agency and getting boxed in by a no-code builder.
You get the best of both worlds: speed and affordability, without ever sacrificing your ability to build unique, scalable features down the road.
Think of it as getting a massive head start. Instead of building from zero, you begin with a solid, professionally built foundation.
Here’s why this is a game-changer:
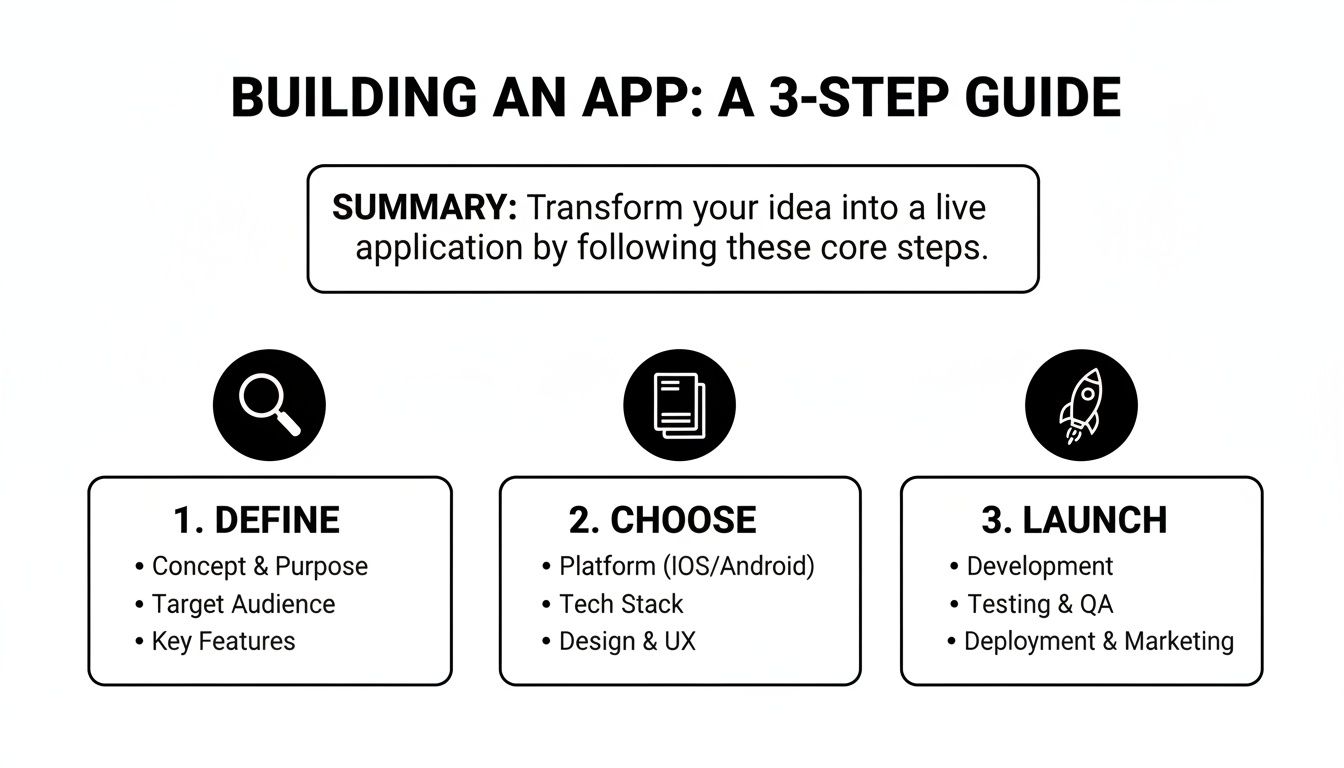
The whole process is refreshingly straightforward. You nail down your app's core purpose, pick a template that already has the basic features you need, and then focus your energy on polishing it into a product your customers will love.
This simple, three-stage workflow—define, choose, launch—is designed to get you moving.
It’s all about working smarter, not harder. You can stop worrying about reinventing the wheel and concentrate on the business logic that makes your app special.
And the timing couldn't be better. The global mobile app market is already massive—somewhere between $750–$800 billion—and it's on track to hit an incredible $1.1 trillion by 2034. With 5.78 billion smartphone users out there, the opportunity is just waiting to be seized.
By starting with a professional template, you are essentially skipping the first 3-6 months of tedious boilerplate work. This head start allows you to concentrate resources on what truly matters: your unique features and user experience.
To put it all in perspective, let's look at how the modern template-based approach stacks up against the old-school methods. Each has its place, but for most businesses looking for a balance of speed, cost, and control, the benefits of starting with a template are clear.
| Factor | Template-Based (gluestack market) | Custom Development | No-Code Builders |
|---|---|---|---|
| Cost | Low ($50 - $500 one-time) | Very High ($50k - $300k+) | Low-to-Mid (ongoing subscription) |
| Speed | Very Fast (Weeks) | Very Slow (Months to a year+) | Fastest (Days to weeks) |
| Customization | High (Full source code access) | Unlimited (Built from scratch) | Limited (Restricted to platform features) |
| Ownership | Full Ownership | Full Ownership | No Ownership (Locked into the platform) |
| Scalability | High | Very High | Limited to Platform |
| Best For | Startups & SMBs needing speed, control, and affordability. | Enterprises with unique needs and large budgets. | Simple MVPs, internal tools, non-technical founders. |
The table really tells the story. For a business that needs to launch a professional, scalable app without an enterprise-level budget, the template-first strategy is a powerful and efficient way forward.
Of course, you still need someone to put the pieces together. If you're not a developer yourself, knowing how to hire remote developers is the next critical piece of the puzzle. Finding the right technical partner is key to customizing your chosen template and truly bringing your vision to life.
Before you ever dream of code or templates, the most important work happens with a pen and paper—or maybe a whiteboard. Building an app for your business doesn't start with technology. It starts with a crystal-clear understanding of the problem you're solving. A brilliant idea is just the beginning; the real magic happens when you focus that idea into a sharp, actionable plan.

I've seen it time and again: businesses try to build everything at once. They create a sprawling list of features, hoping to please every single person who might download the app. This approach almost always leads to a bloated, confusing product that does nothing well and costs a fortune to build.
There's a much smarter way. Define a razor-sharp purpose and build a Minimum Viable Product (MVP) around it.
Your app needs a mission. This isn't just about what it does—it's about the specific pain point it fixes for a specific group of people. Vague goals like "improving customer engagement" are too fluffy. You need to get granular.
For instance, a local coffee shop's app mission isn't just "to sell coffee." A better, more focused mission would be: "To help busy commuters pre-order and pay for their morning coffee in under 30 seconds so they can skip the line." See the difference? This simple statement defines both the target user (busy commuters) and the core value (speed and convenience).
To find your app's true mission, ask yourself these questions:
Answering these forces you to stop building on assumptions. Instead, you're building a solution to a real, validated problem. If you want to dig deeper into this planning phase, our detailed guide on how to build a mobile app offers a broader perspective.
Once you have your mission locked down, it's time to define your MVP. An MVP is not a cheap or half-baked version of your app. It is the most focused version—the one that contains only the essential features needed to solve that one core problem for your very first users.
An MVP is the smallest thing you can build that delivers real value to customers. Its primary goal isn't to be a final product, but a learning tool. You launch it to see if people actually want what you've built before you sink more time and money into it.
Think of it like building a car. You wouldn't try to manufacture the entire vehicle at once. The MVP isn't a single tire. It's more like a skateboard—it has wheels, a board, and it gets you from point A to B. It’s a complete, functional product that solves the core transportation problem, even if it lacks doors, an engine, or air conditioning.
Defining your MVP requires you to be ruthless with your feature list. The goal is to separate the absolute "must-haves" from the "nice-to-haves." A simple but incredibly effective method for this is the MoSCoW framework:
By slotting every potential feature into these categories, you create a clear roadmap. You launch with only the "Must-Haves," gather real user feedback, and then use that data to decide which "Should-Have" or "Could-Have" features to build next. This iterative process ensures you are always building what your customers actually want, not just what you think they want.
Once you've nailed down your MVP, it’s time for the next big decision: your app’s foundation. This is hands-down the biggest shortcut you can take to get your business app built quickly and without breaking the bank. Picking the right React Native template isn't just about grabbing a nice design; it’s about giving yourself a massive head start that can save hundreds, if not thousands, of development hours.
The market is flooded with options. You’ve got basic UI kits on one end and comprehensive, industry-specific templates on the other. A general UI kit is like a toolbox—it gives you all the components like buttons, forms, and navigation bars. But a domain-specific template? That’s like getting a pre-built house frame. A fitness app template will already have screens for workout tracking and progress charts, while a finance app starter kit will come with dashboards and transaction list UIs ready to plug in.
Let's be clear: not all templates are created equal. A cheap or poorly coded template can create more headaches than it solves, bogging you down in a frustrating mess of spaghetti code. When you're browsing a marketplace, you need to know what signals quality.
Here’s a practical checklist to keep in your back pocket:
Having a solid grasp of the underlying tech helps, too. The better your understanding of the React Framework, the more effectively you can judge a template's structure and its potential for future customization.
The mobile app market is absolutely exploding. Its value is projected to leap from $252.89 billion in 2023 to a staggering $626.39 billion by 2030. Cross-platform frameworks like React Native are at the heart of this growth, enabling up to 70% faster development cycles compared to building separate native apps from scratch.
This is where templates really shine. They're a prime example of this efficiency, offering a fast track to market for iOS, Android, and even the web.

Marketplaces like gluestack market offer these pre-built solutions for all sorts of industries. As you can see, having starters for everything from meditation to finance apps can dramatically speed up your project.
Finally, don't skip the fine print. Pay close attention to the license, because it dictates exactly how you can use the template—both now and in the future.
A template’s license is not just legal jargon; it's a critical part of your business strategy. Choosing the wrong one can limit your ability to sell your app or scale your business down the line.
Most marketplaces offer a few different tiers:
Always read the terms carefully to make sure the license lines up with your monetization plans. Choosing the right template from the get-go is an investment that pays off big time, putting you on a clear and confident path to a successful launch. If you want a little more guidance on this, check out our guide on how to choose a React Native app template: https://market.gluestack.io/blog/react-native-app-template.
Alright, you’ve nailed down your MVP scope and picked the perfect React Native template. Now for the exciting part: rolling up your sleeves and actually building this thing.
This is where your vision starts to become a reality. Forget starting from a blank screen; this is all about smart, focused customization. We're taking a solid foundation and molding it into an app that’s uniquely yours.
A lot of people get intimidated at this stage, but the tooling today has made it more approachable than you'd think. We're going to walk through a practical workflow that keeps things clear and efficient, so you can see real progress, fast.
Honestly, one of the best moves you can make is to choose a template built with Expo. Think of Expo as the ultimate assistant—it handles all the tedious, behind-the-scenes configuration for iOS and Android so you can stay focused on building features.
Getting started is surprisingly painless. Most quality templates, especially the ones you’ll find on gluestack market, come with dead-simple setup instructions. You’ll just open your terminal, jump into the project folder, and run a couple of commands like npm install and then npx expo start.
That’s literally it.
In a few seconds, a QR code pops up. Scan it with the Expo Go app on your phone (iPhone or Android, doesn't matter), and boom—the app is running on your actual device. This instant feedback is a game-changer. It makes development feel less abstract and a whole lot more interactive.
With the app running, the next step is to get familiar with the code. Any well-built template will have a folder structure that just makes sense. You'll typically find a few key directories:
HomeScreen.tsx or ProfileScreen.tsx.Your first real task is to inject your brand's personality into the template. This usually means tweaking a central theme or config file. You might find a theme.ts file, for example, where you can swap out the primary color's hex code. Change it once in that single spot, and you'll see every button, header, and icon across the entire app update instantly.
A good template doesn’t box you in. It gives you a flexible, organized system where branding changes are global and simple. This saves you from the soul-crushing work of hunting down and restyling every single component by hand.
You'll probably notice that most files end in .tsx, not .js. That's because professional-grade templates are built with TypeScript, which is basically JavaScript with superpowers. The main benefit is simple: it helps you catch bugs before they even happen.
Imagine you have a component that needs a user's name (a string of text), but you accidentally pass it a number. In plain JavaScript, this might cause a mysterious crash later on. TypeScript stops you right in your tracks, showing you an error in your code editor before you even run the app. This safety net is invaluable for keeping your code predictable and much easier to manage as it grows.
Now for the really fun stuff—making real, visible changes to the app. Let's imagine you're building a fitness app and want to add a new screen for workout details. Here’s what that workflow looks like in practice:
WorkoutDetailScreen.tsx, and place it in the screens folder.<Card>, <Text>, and <Button>). This is where a UI library like gluestack-ui becomes a massive time-saver, letting you build beautiful, consistent interfaces with very little code.WorkoutDetailScreen."This component-based method feels a lot like playing with LEGOs. You're not reinventing the wheel; you're just composing new experiences from a library of reliable, pre-designed parts. This loop—adding screens, customizing components, and wiring up navigation—is the core rhythm of bringing your app to life.
A buggy, frustrating app is one of the fastest ways to lose a customer's trust. So, before you even think about hitting that "publish" button, you need a rigorous testing phase. This isn't optional. This is where you polish your app, squash bugs, and make sure the user experience is every bit as smooth as you envisioned.

This process goes way beyond just making sure things don't crash. It's about delivering a professional product that truly reflects the quality of your business. A clean launch sets the stage for killer reviews and strong initial growth.
First up is digging into the technical nuts and bolts. You need to verify that every single button, form, and feature works exactly as it should. This is where a tool like Expo really shines.
With Expo, you can easily run your app on real iOS and Android devices without a complicated setup. Trust me, this is huge. A feature that works perfectly fine in a simulator might completely fall apart on an actual phone.
Your functional testing checklist should cover:
Think of this phase as a detailed inspection. You're methodically checking every single part of your app to ensure it’s built correctly and reliably. The goal is to leave no room for obvious errors that could frustrate your very first users.
For a deeper dive into troubleshooting, our guide on React Native debugging techniques has some more advanced tips for pinpointing and fixing those tricky issues.
Okay, so you're confident the app is technically sound. Now for the most important test of all: User Acceptance Testing (UAT). Functionality is one thing, but usability is a completely different beast. UAT is where you put your app into the hands of your real target audience to see how they actually use it.
You might think a button's placement is perfectly intuitive, but I guarantee a real user will find a way to get confused. These are the kinds of critical insights you can only get from a fresh pair of eyes.
For UAT, round up a small group of people who fit your ideal customer profile. Ask them to perform specific tasks without any hand-holding, like:
Watch them like a hawk. Where do they hesitate? What confuses them? Their feedback is pure gold and will expose usability flaws you were simply too close to the project to see. This step is absolutely essential when you want to make an app for my business that people will genuinely enjoy using.
With testing complete and your app polished, you’re on the final sprint: prepping for submission to the Apple App Store and Google Play Store. This involves a lot more than just uploading a file. It’s about creating a compelling store listing that convinces people to hit that "download" button.
Your submission package has to include:
Finally, you'll use Expo's build service to generate the final binary files—an .ipa for iOS and an .aab for Android. From there, you just need to follow the specific guidelines for each store, upload these builds, fill out all the metadata, and submit your app for review. This is the culmination of all your hard work, paving the way for a killer launch.
Diving into app development, even with a solid template, is bound to bring up a few questions. Let's tackle some of the most common things business owners ask when they're thinking about building their app this way. My goal here is to give you straight, clear answers so you can move forward feeling confident.
This is always the first question, and for good reason. Using a template completely changes the budget conversation compared to building from scratch. A fully custom app can easily run you $50,000 to $300,000+, sometimes even more. In contrast, a high-quality React Native template is a one-time purchase, usually somewhere between $100 and $1,000.
That initial cost gets you the entire foundation—the UI, the navigation, and all the core feature screens. Your main additional costs will be for any specific customizations, fees for third-party services you want to integrate (like Stripe for payments or Google Maps for location), and the standard developer account fees for the Apple and Google Play stores.
The savings are huge. It means you can put more of your budget into marketing or building out that one killer feature, instead of burning cash just to get a basic structure in place.
You don't need to be a senior developer with a decade of experience, but a basic grasp of JavaScript and React will go a long way. These templates are designed to save you from writing all the complex, repetitive boilerplate code, but they aren't no-code platforms. You'll still need to get into the code to hook up your business logic and tweak the UI to fit your brand.
The good news is, modern tools have made this whole process much more approachable.
Think of it like this: the template is the professionally built frame of a house. You still need some basic carpentry skills to put up the drywall and paint, but you're not trying to pour the foundation yourself.
The real win here is that you’re not starting from an empty field. You're starting with a solid, well-architected structure, which makes the whole project faster and a lot less likely to have major foundational problems down the road.
Absolutely. This is probably the biggest reason to go with a code-based template instead of a locked-down, no-code builder. You get the full source code, which means you have total freedom to build anything you can dream up. The template is just your starting line, not a fence.
For example, let's say you bought a fitness app template but you want to add a unique AI-powered meal planner. No problem. A developer can build out new screens, integrate with any API you need, and adjust the user experience to perfectly match what you're trying to do. You're never stuck with a pre-set list of features, which means your app can grow and change as your business does.
Getting your app live is a huge milestone, but it's really just the beginning of the journey. What you do after the launch is what determines long-term success. Your focus shifts from building to growing. The mobile app market is exploding, with its value expected to jump from $252.89 billion in 2023 to a mind-boggling $626.39 billion by 2030. That shows you the incredible potential for apps that are actively managed and improved. If you want to dig into the numbers, you can explore the full mobile app development strategy report on clariontech.com.
After launch, your work will mostly fall into three buckets:
This cycle—launch, learn, improve—is how you build an app that doesn't just have a great launch day but stays relevant and valuable to your customers for years.
Ready to skip the boilerplate and start building your business app today? gluestack market offers a curated collection of production-ready React Native templates designed to get you to market faster. Find the perfect foundation for your project and focus on what makes your app unique.

Feb 23, 2026
4 min read
Discover powerful mobile app monetization strategies to boost your revenue. Our guide covers IAPs, ads, and subscriptions for React Native apps and beyond.

Feb 22, 2026
4 min read
A clear guide to app development cost estimation. Learn what drives costs, see budget examples, and discover strategies to build your app for less.

Feb 21, 2026
4 min read
Discover how to promote mobile application effectively with proven ASO, paid campaigns, and retention strategies.

Feb 15, 2026
4 min read
Discover how to create a prototype of a website with a practical, step-by-step guide. Explore tools, testing methods, and tips to bring your idea to life.

Feb 14, 2026
4 min read
Confused about mockups vs wireframes? Learn the key differences, when to use each, and how to streamline your React Native app development workflow.

Feb 13, 2026
4 min read
Discover how mobile apps templates accelerate development. Learn to choose, customize, and deploy high-quality React Native templates for your next project.

Feb 12, 2026
4 min read
Explore mobile application interface design with practical tips, core principles, and platform-aware workflows to craft apps users love.

Feb 10, 2026
4 min read
Learn mobile first design principles to craft fast, accessible apps that delight users. Practical tips, examples, and testing strategies.

Feb 08, 2026
4 min read
Explore the progressive web app vs native debate with our in-depth guide. We compare performance, cost, and UX to help you make the right strategic choice.

Feb 07, 2026
4 min read
Discover how React Native templates can accelerate your app development. This guide explores choosing, customizing, and deploying templates for faster launches.

Feb 05, 2026
4 min read
Discover the key differences between expo vs react native, including workflow, builds, and performance to help you pick the right path for your app.

Feb 03, 2026
4 min read
Master image with text overlay in React Native with responsive, accessible patterns. Learn expo setup, NativeWind styling, and gluestack-ui examples.

Feb 03, 2026
4 min read
Discover cross platform app development with proven strategies to build faster for iOS, Android, and the web using a single, unified codebase.

Jan 31, 2026
4 min read
Ready to build an app? This guide shares practical strategies for validating your idea, choosing a tech stack, and navigating the App Store launch.

Jan 30, 2026
4 min read
Master responsive design for mobile apps with this guide on fluid layouts, breakpoints, and React Native. Build UIs that adapt perfectly to any screen.

Jan 25, 2026
4 min read
Learn how to design an Android app that stands out. This guide covers UX research, wireframing, Material Design, and the developer handoff process.

Jan 24, 2026
4 min read
Explore ui design web essentials: a complete guide to principles, responsive patterns, and workflows for intuitive, engaging web interfaces.

Jan 23, 2026
4 min read
Discover 10 essential mobile app design best practices for building exceptional cross-platform apps. Actionable tips for UI, UX, navigation, and performance.

Jan 21, 2026
4 min read
Discover how to debug React Native apps effectively. This guide covers Flipper, React DevTools, and native code troubleshooting for faster development cycles.

Jan 20, 2026
4 min read
Learn how to create app for your business with a practical, modern approach. Plan, customize, and launch with proven steps.

Jan 19, 2026
4 min read
A complete guide to mobile app development for startups. Learn how to validate your idea, build an MVP, and launch a successful app faster and more affordably.

Jan 18, 2026
4 min read
Discover how to choose the right React website template to accelerate your project. Our guide covers everything from quality checklists to deployment.

Jan 17, 2026
4 min read
Discover how to choose, customize, and deploy a React Native app template. This guide provides practical steps for launching production-ready apps faster.

Jan 16, 2026
4 min read
Discover how mobile application templates accelerate development. This guide covers how to choose, customize, and launch your app with the right foundation.

Jan 13, 2026
4 min read
Start your journey in mobile app development for beginners. This guide breaks down how to build your first cross-platform app with React Native and Expo.

Jan 12, 2026
4 min read
Explore the best react native ui libraries and compare features, performance, and ease of use to pick the right toolkit for your app.

Jan 11, 2026
4 min read
Launch your own ride-hailing service with our guide to building a production-ready Uber app clone. Learn MVP strategy, tech stacks, and backend integration.

Jan 10, 2026
4 min read
Master modern cash app design with this guide. Learn the UI/UX, security, and React Native strategies needed to build a fintech app that users trust and love.

Jan 09, 2026
4 min read
Learn how to build a personal finance dashboard with React Native. A practical guide for developers on UI design, data architecture, and production readiness.

Jan 08, 2026
4 min read
A practical guide to building a cross-platform event check in app with React Native. Learn to implement QR scanning, offline sync, and deployment.

Jan 07, 2026
4 min read
Master linear gradient React Native components with our complete guide. Learn practical techniques for Expo, bare RN, and NativeWind to build stunning UIs.

Jan 06, 2026
4 min read
Learn how to change application name in your React Native & Expo projects. This guide covers display names, package IDs, and app store listings.

Jan 05, 2026
4 min read
Discover how to monetize mobile apps with our founder's guide. Learn proven React Native strategies for ads, IAPs, and subscriptions to maximize your revenue.

Jan 04, 2026
4 min read
A practical guide on how to create a website app with a single codebase. Learn to build for web, iOS, and Android using React Native, Expo, and TypeScript.

Jan 03, 2026
4 min read
Learn how to create an app for your business with this definitive guide. Discover practical strategies for validation, development, and launch that work.

Jan 02, 2026
4 min read
Learn how to create a wireframe for a website with this practical guide. Move from initial sketches to developer-ready designs that get built right.

Jan 01, 2026
4 min read
Deciding on progressive web application vs native? This guide offers a deep comparison of performance, cost, UX, and use cases to help you choose wisely.

Dec 31, 2025
4 min read
Discover 10 mobile app security best practices for React Native. Learn to secure data, APIs, and code with actionable tips and examples for 2025.

Dec 30, 2025
4 min read
Unlock the real React Native app development cost. Our guide breaks down pricing by feature, team, and complexity to help you budget with confidence.

Dec 29, 2025
4 min read
A practical guide to master your React Native debug workflow. Learn to use Flipper, React DevTools, and Hermes to solve bugs in Expo and bare RN apps.

Dec 28, 2025
4 min read
The ultimate React Native tutorial for beginners. Learn to build beautiful cross-platform apps using a modern stack like Expo, TypeScript, and gluestack-ui.

Dec 27, 2025
4 min read
A practical guide on how to build a mobile app. Learn to go from concept to a market-ready app using templates, React Native, and proven development strategies.

Dec 26, 2025
4 min read
Discover interface design for websites with actionable tips on layout, responsiveness, and usability to boost conversions.

Dec 25, 2025
4 min read
Discover designs for apps that blend minimal aesthetics with personalization, and learn to build user-centric interfaces that boost engagement.

Dec 24, 2025
4 min read
Learn graphical interface design - essentials for mastering core principles, modern workflows, and cross-platform strategies to build intuitive, engaging UIs.

Dec 23, 2025
4 min read
Discover how high fi wireframes bridge the gap between ideas and code. Learn a practical workflow for creating, testing, and handing off effective UI designs.

Dec 22, 2025
4 min read
Discover mobile app interface design with practical principles, accessibility, and workflows that boost user engagement.

Dec 21, 2025
4 min read
Explore the top 10 UI UX design trends for 2025. Get expert insights and practical React Native tips to build next-gen cross-platform apps that stand out.

Dec 20, 2025
4 min read
Discover how mobile app templates accelerate development from idea to launch. Learn to select, customize, and deploy templates for a faster time to market.

Dec 18, 2025
4 min read
Explore the best react native ui libraries to accelerate mobile development with performance, theming, and accessibility. Expert tips inside.

Dec 16, 2025
4 min read
Master React Native PDF handling. Learn to generate, view, and share PDFs with practical code examples, library comparisons, and performance tips.

Dec 15, 2025
4 min read
A practical guide to choosing the right React Native component library. Learn how to evaluate options, avoid common pitfalls, and build apps faster.

Dec 14, 2025
4 min read
Find the perfect React Native UI library for your project. This guide compares top libraries, selection criteria, and customization strategies.

Dec 13, 2025
4 min read
Learn how to change app name in React Native and Expo. Our guide covers display names, bundle IDs, and store listings for iOS and Android projects.

Dec 12, 2025
4 min read
Discover the best React Native component library for your next project. We compare top libraries on performance, customization, and real-world use cases.

Dec 11, 2025
4 min read
Discover how to choose the right React Native UI kit. This guide covers top kits, selection criteria, and customization to accelerate your app development.

Dec 10, 2025
4 min read
Explore our in-depth guide to find the best React Native UI library. We compare top contenders to help you choose the right fit for your project.

Dec 09, 2025
4 min read
Discover a practical approach to building apps with React Native. This guide covers setup, UI, state management, and testing to help you ship great apps.

Dec 08, 2025
4 min read
android login with facebook: Learn to set up the Facebook SDK, manage tokens, and implement secure authentication across native Android, cross-platform apps.

Dec 07, 2025
4 min read
Master the alert in React Native. Learn to handle platform differences, build custom modals, and apply best practices for a seamless user experience.

Dec 06, 2025
4 min read
keyboardavoidingview react native: Master keyboard handling with KeyboardAvoidingView across iOS, Android, Expo, and TypeScript.

Dec 05, 2025
4 min read
A practical guide to implementing a React Native PDF viewer. Learn to compare libraries, handle native setup, and troubleshoot common issues with real code.

Dec 04, 2025
4 min read
how to validate startup idea: learn proven methods like customer interviews, MVPs, and metrics to confirm market fit.

Dec 03, 2025
4 min read
how to make app like uber: Learn core features, tech stack, development steps, testing, and launch tips.

Dec 02, 2025
4 min read
Build a rock-solid React Native setup. This guide covers Expo vs. Bare workflows, TypeScript, pnpm monorepos, NativeWind, and deployment strategies.

Dec 01, 2025
4 min read
A practical guide to Stripe React Native integration. Learn to set up your server, build payment UIs, handle webhooks, and launch secure mobile payments.

Nov 30, 2025
4 min read
Learn how to master push notifications in React Native. This guide covers setup, best practices, and advanced techniques for engaging your users.

Nov 29, 2025
4 min read
Build powerful location-based apps with our practical guide to react native with google maps. Get setup guides, pro tips, and best practices for iOS & Android.

Nov 28, 2025
4 min read
Explore deep linking react native with a practical guide to configuring URL schemes, universal links, navigation, and testing for Expo and bare apps.

Nov 28, 2025
4 min read
A practical guide to building a scalable React Native design system. Learn to implement tokens, theming, and tools like NativeWind and gluestack-ui.

Nov 26, 2025
4 min read
Learn why react native expo templates speed up your projects with ready-made patterns and practical tips.

Nov 25, 2025
4 min read
Discover how to improve developer productivity with actionable strategies for workflow, tooling, and culture. A practical guide for software engineering teams.

Nov 24, 2025
4 min read
Discover the best cross platform app development tools. Compare top frameworks like Flutter and React Native to build and ship apps faster.

Nov 23, 2025
4 min read
This Expo React Native tutorial provides a hands-on guide to building cross-platform apps. Learn setup, styling with NativeWind, navigation, and deployment.

Nov 22, 2025
4 min read
Build beautiful UIs faster with this guide to Tailwind CSS React Native. Learn setup, styling, and advanced techniques with NativeWind for mobile apps.

Nov 21, 2025
4 min read
Explore our curated list of 7 top-tier React Native app examples. Discover production-ready templates and resources to build your next app faster.

Mar 19, 2025
4 min read
gluestack market offers React Native UI templates to accelerate development. Get customizable, production-ready React Native app templates and Ui kit, some free. Build faster & smarter today!