Jan 13, 2026

4 min read

Diving into mobile app development can feel like trying to climb a mountain without a map. But what if I told you there's a much smarter, more direct path to the top? The key is picking a modern, cross-platform stack like React Native and Expo. This combo lets you write your code just once and see it run beautifully on both iOS and Android.
This guide is all about skipping the usual headaches and getting you straight to building a real, working app—fast.
Let's be real: the old way of learning two entirely different, complex programming languages just to build one app is a grind. The modern approach is way more efficient and frankly, a lot more fun, especially if you're just starting out. We're going to focus on a powerful setup that startups and solo devs absolutely love because it delivers professional results without that soul-crushing learning curve.
This isn't just about making things easier; it's about being smart and fast. The global mobile app market is absolutely exploding—it's expected to hit nearly $800 billion in 2025 and is on track to smash $1.1 trillion by 2034. For indie developers and small teams, this isn't just a statistic; it's a massive opportunity. There has never been a better time to turn your idea into reality.
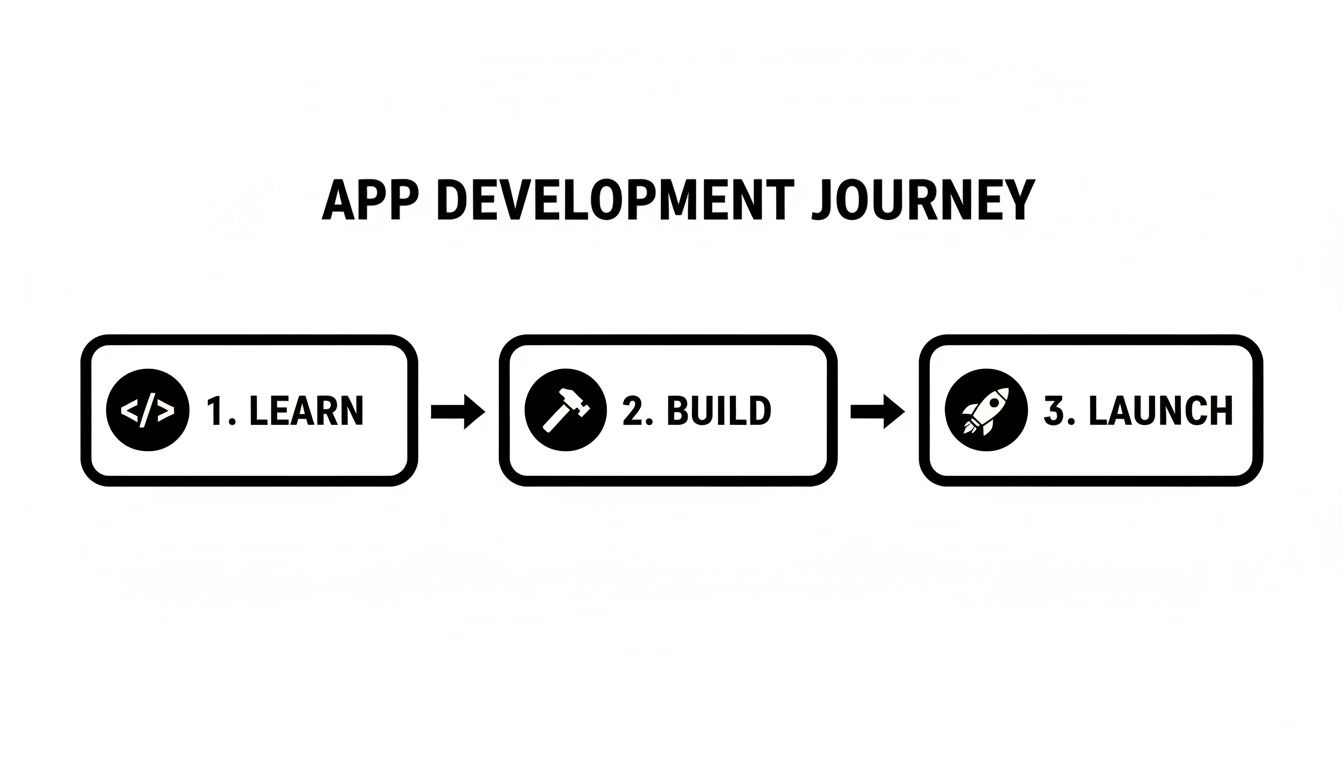
So, how do we get you from zero to a launched app without all the noise? We’ll stick to three core principles that I've seen work time and time again for new developers:
This simple journey—learn, build, and launch—is exactly what we're aiming for.
The big takeaway here is that you don't have to build every single piece from scratch to create something incredible.
For beginners, the best strategy is to build a Minimum Viable Product (MVP). An MVP has just enough features to get it into the hands of your first users and see if your idea has legs. It’s all about validating your concept early on.
This approach saves you from sinking a ton of time and money into an idea before you even know if people want it. If you want to see how the pros do it, it's worth checking out these great examples of understanding Minimum Viable Product (MVP) examples. And when you're ready to get your hands dirty with code, our detailed https://market.gluestack.io/blog/react-native-tutorial-for-beginners is the perfect next step.
I've put together a quick look at the core technologies we'll be using. This isn't just a list; it's the 'why' behind each choice and how it genuinely helps you as a new developer.
| Technology | Its Role in Your Project | Why It's a Game-Changer |
|---|---|---|
| React Native | The main framework for building your app's logic and interface. | Lets you write one set of code for both iOS and Android, saving massive amounts of time and effort. |
| Expo | The toolchain that simplifies building, testing, and deploying your app. | No complex native code setup. You can test directly on your phone in minutes, which is huge for morale. |
| TypeScript | Adds static typing to your JavaScript code. | Catches common errors before you run your app, making your code more reliable and easier to maintain. |
| gluestack-ui | A library of pre-built, accessible UI components. | Gives you beautiful, consistent, and professional-looking buttons, forms, and menus right out of the box. |
| NativeWind | A utility-first CSS framework (like Tailwind CSS for React Native). | Makes styling your app incredibly fast and intuitive, letting you customize designs without writing tons of CSS. |
Ultimately, this stack is designed for one thing: getting you from idea to app store as efficiently as possible, while still building a high-quality product. It's the perfect launchpad.
Before you write a single line of code, you need to set up your workshop. A clean, efficient development environment is the secret to a smooth start in mobile app development, especially for beginners. Getting this right from the start saves you from the common frustrations that can completely derail your progress.

We're going to focus on just three core components to get you up and running: Node.js, a code editor, and the Expo Go app. Believe it or not, this simple setup is all you need to start building and instantly seeing your work come to life on your own phone.
First things first, you'll need Node.js. Think of it as the engine that runs all your JavaScript code outside of a web browser. It’s absolutely essential for the React Native and Expo ecosystem, giving you the runtime and a ridiculously powerful package manager called npm (Node Package Manager).
Getting Node.js installed is super straightforward:
node -v. You should see the version number you just installed.Next up is your code editor. You could technically use any text editor, but Visual Studio Code (VS Code) is the undisputed industry standard for good reason. It’s free, incredibly powerful, and has a massive community building extensions that make development so much faster.
Pro Tip: Don't sleep on extensions! I highly recommend installing tools like Prettier for automatic code formatting and ESLint for catching errors as you type. They'll save you countless hours of painful debugging by cleaning up your code and enforcing best practices without you even thinking about it.
This is where the magic of Expo really hits home. Instead of wrestling with clunky, slow simulators, you can see your app running on your actual phone in real-time. For a new developer, that immediate feedback loop is incredibly motivating.
All you have to do is grab the Expo Go app, which is free on both the iOS App Store and Google Play Store. Just download it to your smartphone. Once we start your first project, you'll scan a QR code from your computer's terminal, and like magic, the app will load right onto your device.
With these three pieces in place—Node.js, VS Code, and Expo Go—your machine is fully prepped. You’ve just built a professional-grade development environment without getting lost in a maze of complicated configurations. If you want a more detailed walkthrough, we have a comprehensive guide that covers the full React Native setup process from A to Z.
Now, you’re ready for the fun part: creating your first app.
That initial jump from theory to a real, working product can be the most nerve-wracking part of learning to code. Staring at an empty project folder is intimidating, so we’re just going to skip that part entirely. Instead of starting from scratch, we're going to put you in the fast lane with a production-ready template.
This approach is all about gaining instant momentum. You’ll start with a fully-functional application—maybe a simple to-do list or a weather app—which gives you a solid foundation you can actually poke around in, understand, and then start to customize. Think of it like learning to cook by following an amazing recipe before trying to invent your own dish.
Your journey starts at the gluestack market, a hub packed with templates designed for this exact purpose. These aren't just half-baked concepts; they’re complete, cross-platform apps built with the modern stack we've been talking about: React Native, Expo, and TypeScript.
Getting started is refreshingly simple:
Honestly, the whole thing usually takes less than five minutes. Once the server is running, you'll see a QR code pop up in your terminal. Go ahead and grab your phone.
The most rewarding moment for any new developer is seeing their code come to life on a real device. Just open the Expo Go app you installed earlier, scan that QR code, and watch your first mobile app load right onto your screen.
This instant feedback loop is incredibly powerful. It’s immediate proof that your environment is set up correctly, and it gives you something tangible to play with, building your confidence from the get-go. If you want more inspiration, you can learn more about the benefits of using high-quality mobile app templates to get a head start.
Alright, you've got a running app. Now it’s time to look under the hood. When you open the project folder in VS Code for the first time, it might look a little crowded, but the structure is actually quite logical once you know what you're looking at.
Let's break down the most important bits you'll be working with:
| Directory / File | Its Purpose in Plain English |
|---|---|
app/ |
This is the heart of your application. It holds all the different screens and the navigation logic that lets users move between them. |
components/ |
Think of these as your reusable LEGO bricks—things like buttons, headers, or input fields that you can use across multiple screens. |
package.json |
This is the project's manifest. It keeps a list of all the third-party libraries (dependencies) and the scripts needed to run everything. |
tailwind.config.js |
Here’s where you’ll define your app’s visual identity—colors, fonts, and spacing—using the power of NativeWind. |
By starting with a template, you get to bypass all the slow, frustrating setup and dive straight into the fun part: seeing, understanding, and tweaking a real-world application. This kind of hands-on experience is simply the fastest way to learn.
Alright, you've got a working app running right on your phone. That's a huge step. Now comes the fun part: making it actually look like your app instead of a generic template.
This is where we get into custom UI, but don't worry, we're not about to get bogged down in complex stylesheets. We'll be using two incredibly handy tools that make styling feel more intuitive and, honestly, a lot faster: gluestack-ui and NativeWind.
Think of them as a power duo. They let you apply visual changes with simple, descriptive class names right in your code. It feels less like traditional coding and more like you're just telling the app what to look like.
If you've ever used Tailwind CSS in web development, you'll feel right at home with NativeWind. It brings that same utility-first philosophy to React Native. Instead of writing separate CSS files, you just add style classes directly to your components.
Want a button to be blue with white text and rounded corners? You'd literally apply classes like bg-blue-500, text-white, and rounded-full. It's a remarkably clean and efficient way to build interfaces.
Meanwhile, gluestack-ui gives you a whole library of pre-built, accessible components—buttons, inputs, modals, you name it. These are all designed to play nicely with NativeWind, giving you a professional-looking design system right out of the box. Your main job is to tweak them to match your vision.
And if you started with a template from the gluestack market, you've got an even bigger head start.

These templates are polished and production-ready, giving you a solid foundation to build upon.
Let's get our hands dirty. The first thing almost everyone wants to change is the color scheme. You can define your app's entire color palette in a single file: tailwind.config.js.
This is where you'll set up your brand’s primary, secondary, and accent colors. Once you define them here, they're available as utility classes across your entire application.
Imagine you want to change the main button color from the template's default blue to a vibrant green. Here’s all you do:
tailwind.config.js file.colors section and pop in your new primary color hex code.Expo will instantly refresh the app on your phone, and just like that, every primary button in your app is now green. This is the power of a centralized config; it makes keeping a consistent look and feel almost effortless. The same logic applies to fonts, spacing, and even how rounded your corners are.
Your app's visual design is a critical factor in user engagement. Research has shown it can take as little as 500 milliseconds for a user to form a first impression. A clean, intuitive, and visually appealing interface encourages them to stay and explore.
Beyond these global styles, tweaking individual elements is just as simple. See a button on the home screen that needs a little more pop? Add a class for a subtle shadow (shadow-md) or give it more breathing room (p-4). Need to change an icon? Just swap the component.
This level of granular control lets you perfect every last detail without getting tangled up in complex code. It's how you truly make the app your own.
So, your app is looking slick and working perfectly in the Expo Go preview. That's a huge milestone. But now it’s time for the real test: getting it out of the development sandbox and into the hands of actual users. This means packaging it into standalone files that anyone can install on their device, no Expo Go required.

This jump can feel intimidating, but a service called EAS Build (part of Expo Application Services) makes it surprisingly painless. It's a cloud-based service that takes your code and does all the heavy lifting, spitting out the final .apk file for Android and .ipa for iOS. No need to own a powerful Mac or wrestle with a complex local setup.
This is your ticket to sharing your app with friends, family, and beta testers for that all-important early feedback, long before you even think about hitting the app stores.
Before you hit that build button, there are a few small but critical details that can make or break a user's first impression. These are the things that separate a hobby project from a professional-grade app, and they’re often overlooked by beginners.
Here’s a quick pre-flight checklist:
Think of these elements as your app's digital handshake. Getting them right sets the stage for a great user experience from the very first tap.
With those professional touches in place, you’re ready to create your first real build. Using EAS Build is as simple as running a command in your terminal for either Android or iOS. The service queues up your build, and once it's done, you get a downloadable link.
This is a huge moment. You can now send this link to anyone, and they can install a real, working version of your app on their phone. It's the perfect opportunity to get honest feedback on usability and hunt down those pesky bugs you might have missed.
The mobile app market is massive and still growing, with downloads projected to hit a staggering 299 billion in 2025. Every one of those downloads is an opportunity, which makes these final prep steps so critical. As you get ready to launch, it's also smart to think about the business side. For anyone planning to turn their app into a serious venture, learning how to write a business plan is an invaluable step toward real success.
Diving into mobile app development always stirs up a ton of questions, especially when you're just starting out. Let's tackle some of the most common ones that pop up when you're working with a modern stack like React Native and Expo.
If you're worried about needing to learn a bunch of complex, platform-specific languages, you can breathe a sigh of relief.
Nope, and that’s the magic of this whole setup. When you build with React Native, you'll spend almost all your time writing JavaScript and TypeScript. The framework is the unsung hero that handles the tough job of translating your code into the native UI elements that iOS and Android understand.
This means you write once and deploy twice. It’s a huge shortcut and the perfect way to get your first project off the ground without getting bogged down in two completely different ecosystems. You can just focus on building cool features.
This trips a lot of people up, but the distinction is actually pretty straightforward. React (sometimes called ReactJS) is a library for building user interfaces on the web. Think websites and web applications running in a browser. It’s all about creating interactive components with things like <div>s and <p> tags.
React Native, on the other hand, takes all the core ideas of React but applies them to mobile. Instead of web tags, you use mobile-first components like <View> and <Text> that become real, native UI elements on a phone. Simply put: React is for the web; React Native is for your phone.
Absolutely. This is where the Expo ecosystem really shines. It comes packed with a huge library of modules that give you dead-simple access to native device hardware.
Need to snap a photo, get the user's location, or pull from their contacts? There’s almost certainly an Expo package for that. You just install it and call it with a few lines of JavaScript.
That’s the real power here—you can tap into sophisticated hardware features without ever writing a single line of Swift or Kotlin. It's what makes the React Native and Expo combo so empowering for newcomers, letting you build apps that feel truly native and feature-rich.
The tools we're using—React Native, Expo, and gluestack-ui—are all free and open-source. You won't pay a dime for the software itself. The only costs you'll run into are when you’re ready to get your app into the hands of users.
And don't worry about build servers. Expo’s cloud service, EAS Build, has a generous free tier that gives you more than enough build credits to launch your first few projects.
Ready to stop wondering and start building? gluestack market is loaded with production-ready templates that give you a massive head start. Browse our free and premium templates today and get your app out the door in a fraction of the time.

Feb 23, 2026
4 min read
Discover powerful mobile app monetization strategies to boost your revenue. Our guide covers IAPs, ads, and subscriptions for React Native apps and beyond.

Feb 22, 2026
4 min read
A clear guide to app development cost estimation. Learn what drives costs, see budget examples, and discover strategies to build your app for less.

Feb 21, 2026
4 min read
Discover how to promote mobile application effectively with proven ASO, paid campaigns, and retention strategies.

Feb 15, 2026
4 min read
Discover how to create a prototype of a website with a practical, step-by-step guide. Explore tools, testing methods, and tips to bring your idea to life.

Feb 14, 2026
4 min read
Confused about mockups vs wireframes? Learn the key differences, when to use each, and how to streamline your React Native app development workflow.

Feb 13, 2026
4 min read
Discover how mobile apps templates accelerate development. Learn to choose, customize, and deploy high-quality React Native templates for your next project.

Feb 12, 2026
4 min read
Explore mobile application interface design with practical tips, core principles, and platform-aware workflows to craft apps users love.

Feb 10, 2026
4 min read
Learn mobile first design principles to craft fast, accessible apps that delight users. Practical tips, examples, and testing strategies.

Feb 08, 2026
4 min read
Explore the progressive web app vs native debate with our in-depth guide. We compare performance, cost, and UX to help you make the right strategic choice.

Feb 07, 2026
4 min read
Discover how React Native templates can accelerate your app development. This guide explores choosing, customizing, and deploying templates for faster launches.

Feb 05, 2026
4 min read
Discover the key differences between expo vs react native, including workflow, builds, and performance to help you pick the right path for your app.

Feb 03, 2026
4 min read
Master image with text overlay in React Native with responsive, accessible patterns. Learn expo setup, NativeWind styling, and gluestack-ui examples.

Feb 03, 2026
4 min read
Discover cross platform app development with proven strategies to build faster for iOS, Android, and the web using a single, unified codebase.

Feb 01, 2026
4 min read
Learn how to make an app for my business quickly with template-based steps from planning to launch, plus tips to scale and optimize.

Jan 31, 2026
4 min read
Ready to build an app? This guide shares practical strategies for validating your idea, choosing a tech stack, and navigating the App Store launch.

Jan 30, 2026
4 min read
Master responsive design for mobile apps with this guide on fluid layouts, breakpoints, and React Native. Build UIs that adapt perfectly to any screen.

Jan 25, 2026
4 min read
Learn how to design an Android app that stands out. This guide covers UX research, wireframing, Material Design, and the developer handoff process.

Jan 24, 2026
4 min read
Explore ui design web essentials: a complete guide to principles, responsive patterns, and workflows for intuitive, engaging web interfaces.

Jan 23, 2026
4 min read
Discover 10 essential mobile app design best practices for building exceptional cross-platform apps. Actionable tips for UI, UX, navigation, and performance.

Jan 21, 2026
4 min read
Discover how to debug React Native apps effectively. This guide covers Flipper, React DevTools, and native code troubleshooting for faster development cycles.

Jan 20, 2026
4 min read
Learn how to create app for your business with a practical, modern approach. Plan, customize, and launch with proven steps.

Jan 19, 2026
4 min read
A complete guide to mobile app development for startups. Learn how to validate your idea, build an MVP, and launch a successful app faster and more affordably.

Jan 18, 2026
4 min read
Discover how to choose the right React website template to accelerate your project. Our guide covers everything from quality checklists to deployment.

Jan 17, 2026
4 min read
Discover how to choose, customize, and deploy a React Native app template. This guide provides practical steps for launching production-ready apps faster.

Jan 16, 2026
4 min read
Discover how mobile application templates accelerate development. This guide covers how to choose, customize, and launch your app with the right foundation.

Jan 12, 2026
4 min read
Explore the best react native ui libraries and compare features, performance, and ease of use to pick the right toolkit for your app.

Jan 11, 2026
4 min read
Launch your own ride-hailing service with our guide to building a production-ready Uber app clone. Learn MVP strategy, tech stacks, and backend integration.

Jan 10, 2026
4 min read
Master modern cash app design with this guide. Learn the UI/UX, security, and React Native strategies needed to build a fintech app that users trust and love.

Jan 09, 2026
4 min read
Learn how to build a personal finance dashboard with React Native. A practical guide for developers on UI design, data architecture, and production readiness.

Jan 08, 2026
4 min read
A practical guide to building a cross-platform event check in app with React Native. Learn to implement QR scanning, offline sync, and deployment.

Jan 07, 2026
4 min read
Master linear gradient React Native components with our complete guide. Learn practical techniques for Expo, bare RN, and NativeWind to build stunning UIs.

Jan 06, 2026
4 min read
Learn how to change application name in your React Native & Expo projects. This guide covers display names, package IDs, and app store listings.

Jan 05, 2026
4 min read
Discover how to monetize mobile apps with our founder's guide. Learn proven React Native strategies for ads, IAPs, and subscriptions to maximize your revenue.

Jan 04, 2026
4 min read
A practical guide on how to create a website app with a single codebase. Learn to build for web, iOS, and Android using React Native, Expo, and TypeScript.

Jan 03, 2026
4 min read
Learn how to create an app for your business with this definitive guide. Discover practical strategies for validation, development, and launch that work.

Jan 02, 2026
4 min read
Learn how to create a wireframe for a website with this practical guide. Move from initial sketches to developer-ready designs that get built right.

Jan 01, 2026
4 min read
Deciding on progressive web application vs native? This guide offers a deep comparison of performance, cost, UX, and use cases to help you choose wisely.

Dec 31, 2025
4 min read
Discover 10 mobile app security best practices for React Native. Learn to secure data, APIs, and code with actionable tips and examples for 2025.

Dec 30, 2025
4 min read
Unlock the real React Native app development cost. Our guide breaks down pricing by feature, team, and complexity to help you budget with confidence.

Dec 29, 2025
4 min read
A practical guide to master your React Native debug workflow. Learn to use Flipper, React DevTools, and Hermes to solve bugs in Expo and bare RN apps.

Dec 28, 2025
4 min read
The ultimate React Native tutorial for beginners. Learn to build beautiful cross-platform apps using a modern stack like Expo, TypeScript, and gluestack-ui.

Dec 27, 2025
4 min read
A practical guide on how to build a mobile app. Learn to go from concept to a market-ready app using templates, React Native, and proven development strategies.

Dec 26, 2025
4 min read
Discover interface design for websites with actionable tips on layout, responsiveness, and usability to boost conversions.

Dec 25, 2025
4 min read
Discover designs for apps that blend minimal aesthetics with personalization, and learn to build user-centric interfaces that boost engagement.

Dec 24, 2025
4 min read
Learn graphical interface design - essentials for mastering core principles, modern workflows, and cross-platform strategies to build intuitive, engaging UIs.

Dec 23, 2025
4 min read
Discover how high fi wireframes bridge the gap between ideas and code. Learn a practical workflow for creating, testing, and handing off effective UI designs.

Dec 22, 2025
4 min read
Discover mobile app interface design with practical principles, accessibility, and workflows that boost user engagement.

Dec 21, 2025
4 min read
Explore the top 10 UI UX design trends for 2025. Get expert insights and practical React Native tips to build next-gen cross-platform apps that stand out.

Dec 20, 2025
4 min read
Discover how mobile app templates accelerate development from idea to launch. Learn to select, customize, and deploy templates for a faster time to market.

Dec 18, 2025
4 min read
Explore the best react native ui libraries to accelerate mobile development with performance, theming, and accessibility. Expert tips inside.

Dec 16, 2025
4 min read
Master React Native PDF handling. Learn to generate, view, and share PDFs with practical code examples, library comparisons, and performance tips.

Dec 15, 2025
4 min read
A practical guide to choosing the right React Native component library. Learn how to evaluate options, avoid common pitfalls, and build apps faster.

Dec 14, 2025
4 min read
Find the perfect React Native UI library for your project. This guide compares top libraries, selection criteria, and customization strategies.

Dec 13, 2025
4 min read
Learn how to change app name in React Native and Expo. Our guide covers display names, bundle IDs, and store listings for iOS and Android projects.

Dec 12, 2025
4 min read
Discover the best React Native component library for your next project. We compare top libraries on performance, customization, and real-world use cases.

Dec 11, 2025
4 min read
Discover how to choose the right React Native UI kit. This guide covers top kits, selection criteria, and customization to accelerate your app development.

Dec 10, 2025
4 min read
Explore our in-depth guide to find the best React Native UI library. We compare top contenders to help you choose the right fit for your project.

Dec 09, 2025
4 min read
Discover a practical approach to building apps with React Native. This guide covers setup, UI, state management, and testing to help you ship great apps.

Dec 08, 2025
4 min read
android login with facebook: Learn to set up the Facebook SDK, manage tokens, and implement secure authentication across native Android, cross-platform apps.

Dec 07, 2025
4 min read
Master the alert in React Native. Learn to handle platform differences, build custom modals, and apply best practices for a seamless user experience.

Dec 06, 2025
4 min read
keyboardavoidingview react native: Master keyboard handling with KeyboardAvoidingView across iOS, Android, Expo, and TypeScript.

Dec 05, 2025
4 min read
A practical guide to implementing a React Native PDF viewer. Learn to compare libraries, handle native setup, and troubleshoot common issues with real code.

Dec 04, 2025
4 min read
how to validate startup idea: learn proven methods like customer interviews, MVPs, and metrics to confirm market fit.

Dec 03, 2025
4 min read
how to make app like uber: Learn core features, tech stack, development steps, testing, and launch tips.

Dec 02, 2025
4 min read
Build a rock-solid React Native setup. This guide covers Expo vs. Bare workflows, TypeScript, pnpm monorepos, NativeWind, and deployment strategies.

Dec 01, 2025
4 min read
A practical guide to Stripe React Native integration. Learn to set up your server, build payment UIs, handle webhooks, and launch secure mobile payments.

Nov 30, 2025
4 min read
Learn how to master push notifications in React Native. This guide covers setup, best practices, and advanced techniques for engaging your users.

Nov 29, 2025
4 min read
Build powerful location-based apps with our practical guide to react native with google maps. Get setup guides, pro tips, and best practices for iOS & Android.

Nov 28, 2025
4 min read
Explore deep linking react native with a practical guide to configuring URL schemes, universal links, navigation, and testing for Expo and bare apps.

Nov 28, 2025
4 min read
A practical guide to building a scalable React Native design system. Learn to implement tokens, theming, and tools like NativeWind and gluestack-ui.

Nov 26, 2025
4 min read
Learn why react native expo templates speed up your projects with ready-made patterns and practical tips.

Nov 25, 2025
4 min read
Discover how to improve developer productivity with actionable strategies for workflow, tooling, and culture. A practical guide for software engineering teams.

Nov 24, 2025
4 min read
Discover the best cross platform app development tools. Compare top frameworks like Flutter and React Native to build and ship apps faster.

Nov 23, 2025
4 min read
This Expo React Native tutorial provides a hands-on guide to building cross-platform apps. Learn setup, styling with NativeWind, navigation, and deployment.

Nov 22, 2025
4 min read
Build beautiful UIs faster with this guide to Tailwind CSS React Native. Learn setup, styling, and advanced techniques with NativeWind for mobile apps.

Nov 21, 2025
4 min read
Explore our curated list of 7 top-tier React Native app examples. Discover production-ready templates and resources to build your next app faster.

Mar 19, 2025
4 min read
gluestack market offers React Native UI templates to accelerate development. Get customizable, production-ready React Native app templates and Ui kit, some free. Build faster & smarter today!